# Automated secure static website deployment for the lazy
> Building an Automated Workflow for Static Website Serving with GitHub, Astrojs, Vercel, and Cloudflare.
Published on 2025-03-28 | Updated on 2025-03-23
https://xsec.fr/en/cybersecurity/vercel-cloudflare-github/
---
import Callout from '@shared/components/Callout.astro'
import { Steps, Step } from '@/components/ui/steps'
Today, static websites have become the go-to solution for who seeking performance, security, and simplicity. However, the deployment process can still be tedious without proper automation. In this article, I'll guide you through setting up a completely automated workflow that takes your static website from code to production with minimal effort. We'll leverage Astrojs as a static website generator, GitHub for version control, Vercel for deployments, Dependabot for updates dependencies analysis and automatics Pull requests on the github repository and Cloudflare for domain management creating a powerful, modern infrastructure that practically runs itself.
## Why Automate Your Static Website Deployment?
Static websites consisting of HTML, CSS, and JavaScript files served directly to browsers - offer great performance and security compared to dynamic sites. However, without automation, you're stuck manually building and uploading files every time you make a change.
An automated workflow eliminates these repetitive tasks, allowing you to:
- Focus on content rather than deployment logistics
- Deploy changes instantly with version control integration
- Implement proper testing and preview environments
- Benefit from global CDN distribution automatically
- Manage domains and SSL certificates effortlessly
Let's explore how **GitHub, Vercel, Cloudflare** and **Astrojs** work together to create this seamless experience.
## Understanding the Tools in Our Stack
### GitHub
GitHub serves as our **code repository**, offering version control and collaboration features. Every change to your website is tracked, reviewed, and approved through GitHub's pull request system before being automatically deployed.
### Vercel
Vercel is a **cloud platform specialized in static site deployments** and serverless functions. It offers exceptional integration with GitHub, automatic preview deployments, and global CDN distribution. Vercel shines especially bright when working with modern frameworks like Next.js, Nuxt, or Astro.
### Cloudflare
Cloudflare provides **DNS management**, **SSL/TLS certificates**, and additional security features. Using Cloudflare alongside Vercel gives you more control over your domain while benefiting from Cloudflare's powerful security features and global network.
### Astrojs
Astrojs is a **modern static site generator** engineered for speed and focused on delivering content-driven websites with exceptional performance. Key features include:
- **Server-side rendering** for quicker initial page loads
- `"Zero JavaScript by default"` philosophy
- **Innovative "Islands Architecture"** for selective interactivity
- **Automatic optimizations** like code splitting and lazy loading
- **Framework-agnostic** nature, supporting various UI libraries
### pnpm
pnpm is a **faster and more disk-efficient package manager** for Node.js projects. It offers:
- **Remarkable speed** in installing packages
- **Efficient disk space usage** through content-addressable store and hard links
- **Strict dependency resolution** to prevent "phantom dependencies"
- **Excellent support for monorepos**
| Feature | npm | yarn | pnpm |
|---|---|---|---|
| Installation Speed | Moderate | Faster than npm | Fastest |
| Disk Space Efficiency | Less Efficient | Less Efficient than pnpm | Most Efficient |
| Dependency Structure | Flattened (with hoisting) | Flattened (with hoisting) | Nested (via symlinks) |
| "Phantom Dependencies" Risk | Higher Risk | Higher Risk | Lowest Risk |
| Monorepo Support | Basic | Good | Excellent |
| Command Familiarity | High | High (mostly compatible with npm) | High (mostly compatible with npm) |
## The Complete Workflow Visualization
Before diving into the setup, let's visualize the entire automated workflow:
```mermaid
graph TB
A[Developer Commits Code] --> B[Push to Repository]
B --> C{Branch Type?}
C -->|Preview Branch| D[Dependabot]
C -->|Main Branch| E[Direct Push]
D --> F[Code Review]
F --> G[Merge to Main]
G --> H[Trigger Webhook]
E --> H
H --> I{Deployment Type?}
I -->|Preview| J[Build Preview Environment]
I -->|Production| K[Build Production Environment]
J --> L[Generate Preview URLs]
L --> M[Add Preview Link to PR]
K --> N[Deploy to Production Domain]
N --> O[TLS Certificate Assessment]
```
This diagram illustrates how code flows from development through GitHub's version control system, triggers Vercel's automated deployments, and connects with Cloudflare for domain and security management.
## Setting Up Your GitHub Repository with an astrojs skeleton
- **Create an Astrojs project** using pnpm :
```bash
pnpm create astro@latest
```
This command will initiate the **Astro setup wizard,** which will guide you through several options, such as choosing a starter template. You can select a minimal template for a basic setup or explore other templates like blog or portfolio depending on your project's needs. Alternatively, you can use the `--template` flag to specify a template directly.
After specifying the project name and selecting your desired options, the Astro CLI will create the project directory and install the necessary **dependencies** using **pnpm**. Once the process is complete, navigate into your newly created project directory using the cd command :
```sh
cd your-project-name
```
During the project initialization, **pnpm** will create a `pnpm-lock.yaml` file. This file ensures that the exact versions of your project's **dependencies** are installed every time, providing consistency across different environments. Unlike npm and yarn, pnpm structures the **node_modules** directory using **symlinks**, which contributes to its efficiency in disk space usage .
To start the Astro development **server** and **preview** your **website locally**, run the following command :
```sh
pnpm dev
```
This command will typically start the development server at `http://localhost:4321/`. Open this URL in your browser to see your new Astro website in action. As you make changes to your project files in the src directory, Astro will **automatically update** the preview in your browser, providing a seamless development experience.
A typical Astro project structure includes a src directory where your website's code resides, with `src/pages` being the primary location for creating website pages. The `astro.config.mjs` file in the project root is used for configuring various aspects of your Astro project, such as integrations and build settings.
With your Astro project set up using **pnpm**, you are now ready to proceed with automating the deployment process, but first let's initiate a git repository :
- Go to GitHub and click "New repository"
- Name your repository (ideally matching your domain name)
- Add a description and set visibility (public or private)
- Initialize with a README file
- Click "Create repository"
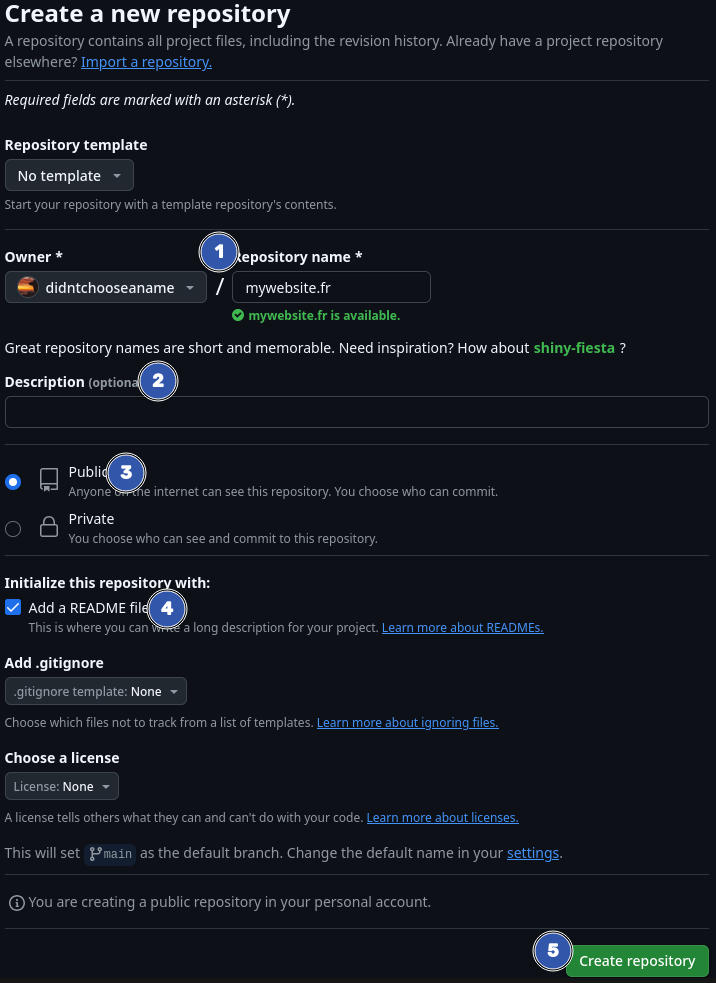
- In a fresh terminal, **Stage, commit** and push to GitHub :
- `git clone yourURL` the new repository with url (if public), if not use your ssh public key and update it on your profile.
- Stage all your files with :
```sh
git add .
```
- Commit the changes with :
```sh
git commit -m "Initial commit of Astro project"
```
- and push to the remote repository on github :
```sh
git remote add origin
git push -u origin main
```
Link your github identity and open your repository folder to vscode are strongly advised, you will benefits of the github mutiple sorfware implementation et push changes easier and faster.
## Configuring Vercel for Automated Deployments
Vercel's integration with GitHub creates a seamless deployment pipeline. Let's set it up:
### 1. Connect Your GitHub Repository to Vercel
Create a Vercel account at `vercel.com` (you can sign up using your GitHub account)
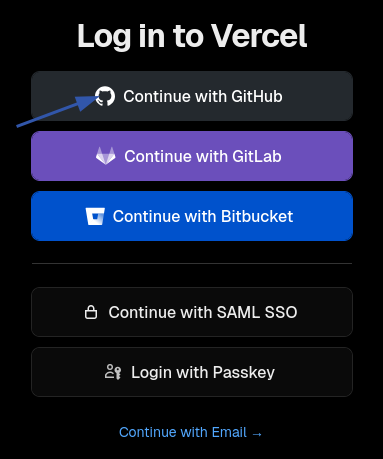
In the Vercel dashboard, click **"New Project"**
Select **"Import GitHub Repository"**
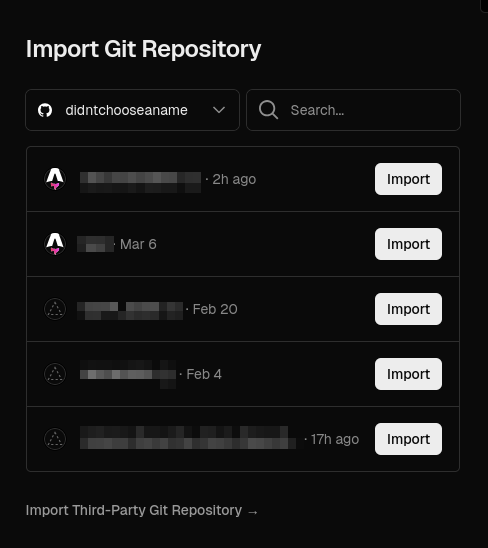
**Authorize** Vercel to access your GitHub account if prompted
### 2. Configure Your Project Settings
Vercel will automatically detect common frameworks (Next.js, React, Vue, etc.) and suggest appropriate settings :
Set the **framework preset** (if applicable, astro will be automatically detected)
Click **"Deploy"**
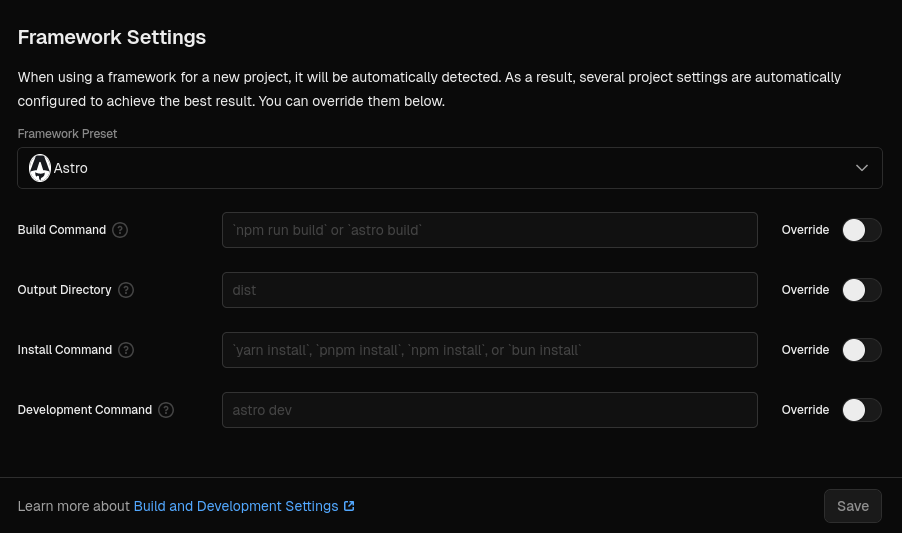
`pnpm` will build your website to the **/dist** folder where you will have html files and directories.
### 3. Understanding the Deployment Process
Let's visualize the GitHub-Vercel deployment workflow:
```mermaid
graph TB
P1[Developer Commits Code] --> P2[Push to GitHub Repository]
P2 --> P3{Branch Type?}
P3 -->|Preview Branch| P4[Dependabot]
P3 -->|Main Branch| P5[Direct Push to Main]
P4 --> P6[Code Review Process]
P6 --> P7[Main Branch]
P7 --> P8[Merge to Main]
P8 --> P9[Vercel Webhook Triggered]
P5 --> P9
P9 --> P10{Deployment Type?}
P10 -->|Preview| P11[Build Preview Environment]
P11 --> P12[Generate Preview URL]
P12 --> P13[Add Preview Link to PR]
P13 --> P14[Developer Review]
P14 -->|Approved| P15[Build Production Environment]
P14 -->|Changes Needed| P16[New Commits]
P16 --> P2
P10 -->|Production| P15
P15 --> P17[Deploy to Production Domain]
P17 --> P18[TLS Certificate Auto-renewal]
P18 --> P19[Production Site Live]
```
This process happens automatically once the integration is set up. Every push to a feature branch creates a preview deployment with a unique URL, while pushes to the main branch update your production site.
## Setting Up Cloudflare for DNS and TLS Management
While Vercel provides its own domain and SSL management, using Cloudflare gives you additional security features and control:
### 1. Add Your Domain to Cloudflare
Create a Cloudflare account if you don't have one
On the dashboard, click "Add a Site"
Enter your domain name and follow the setup instructions
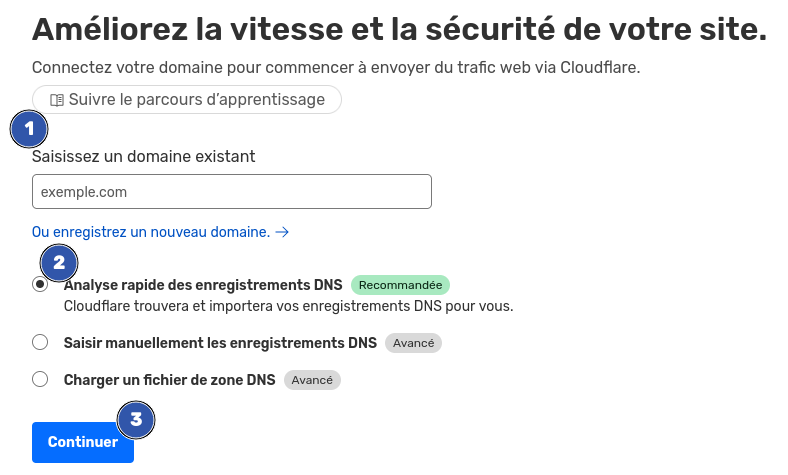
Cloudflare will scan your existing DNS records
**Update** your domain's **nameservers** witin your **domain registrar** dashboard to point to Cloudflare's nameservers.

### 2. Configure DNS Records for Vercel
After your domain is active on **Cloudflare**, set up the DNS records to point to your Vercel deployment:
In Cloudflare dashboard, go to the DNS section for your domain
Add an **A** record:
- Type: A
- Name: @ (representing your root domain)
- Target: 76.76.21.21 (Vercel's IP address)
- Proxy status: Off (important for compatibility with Vercel)
Add a **CNAME** record:
- Type: CNAME
- Name: www
- Target: cname.vercel-dns.com
- Proxy status: Off
The DNS configuration can be visualized as follows:
```mermaid
graph TB
D1[User Request] --> D2[Cloudflare DNS]
D2 --> D3{Record Type?}
D3 -->|A Record| D4[A Record]
D3 -->|CNAME Record| D5[CNAME Record]
D4 --> D6[Root Domain Request]
D5 --> D7[WWW Subdomain Request]
D6 -->|Vercel IP: 76.76.21.21| D8[Vercel Edge Network]
D7 -->|cname.vercel-dns.com| D8
D8 --> D9[Your Static Website]
```
### 3. Configure SSL/TLS in Cloudflare
In Cloudflare dashboard, go to the **SSL/TLS section**
Set **SSL/TLS encryption** mode to **"Full"**
Enable **"Always Use HTTPS"** to redirect all **HTTP** traffic to **HTTPS**
Cloudflare will automatically provision and manage **certificates** for your domain
## Adding Your Custom Domain to Vercel
Now, connect your Cloudflare-managed domain to your Vercel project:
In Vercel dashboard, select your project
Go to **"Settings"** > **"Domains"**
Enter your domain name :
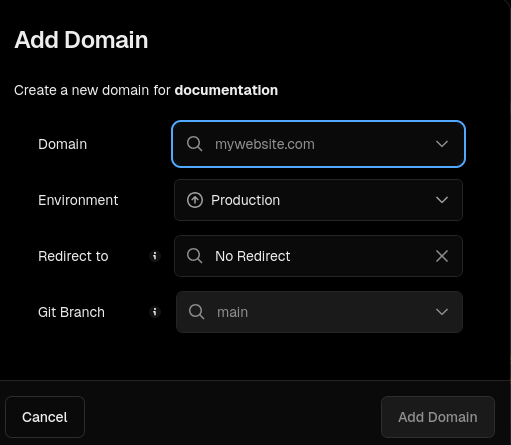
Click **"Add Domain"**
Vercel will verify the DNS configuration
If your DNS is configured correctly in Cloudflare, Vercel will verify the domain successfully. If not, Vercel will provide instructions to fix the configuration.
## Automating Dependency Updates with Dependabot
**Dependabot** is a powerful tool that automatically updates dependencies in your project through pull requests (PRs). Here's how you can set it up :
- Navigate to your repository's settings on GitHub.
- Under the **"Security"** section, enable Dependabot alerts, security updates, and version updates.
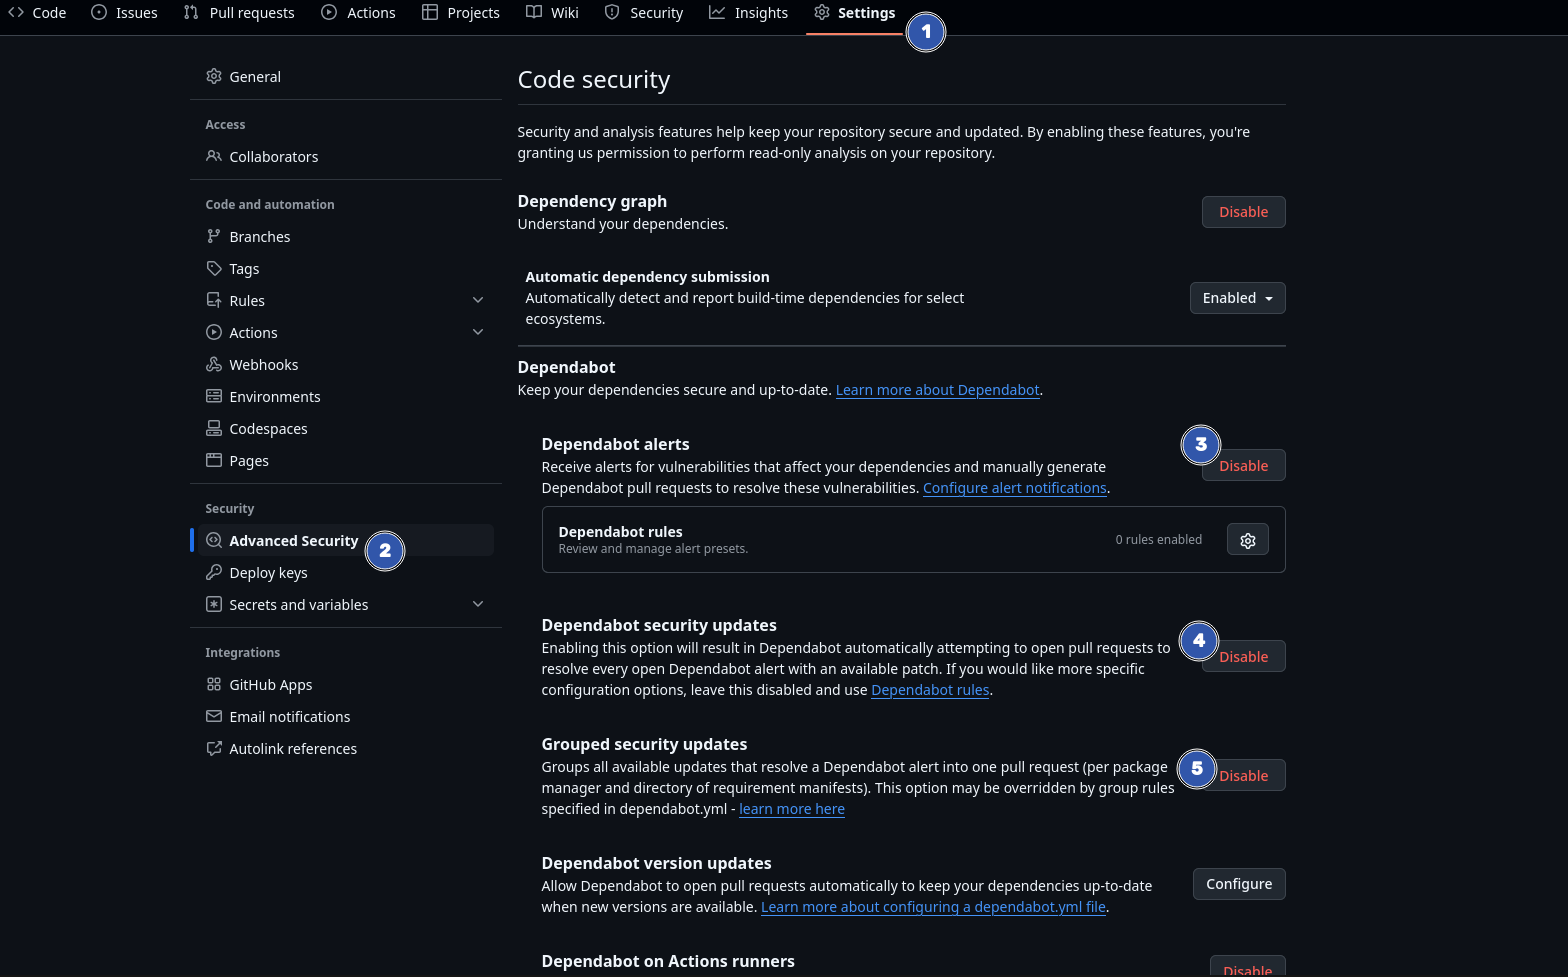
- Add a `dependabot.yml` file in the `.github` folder at the root of your repository:
```yml
version: 2
updates:
- package-ecosystem: "npm"
directory: "/"
schedule:
interval: "daily"
groups:
patch-updates:
patterns:
- "*"
update-types:
- "patch"
minor-updates:
patterns:
- "*"
update-types:
- "minor"
pull-request-branch-name:
separator: "-"
ignore:
- dependency-name: "*"
update-types: ["version-update:semver-major"]
```
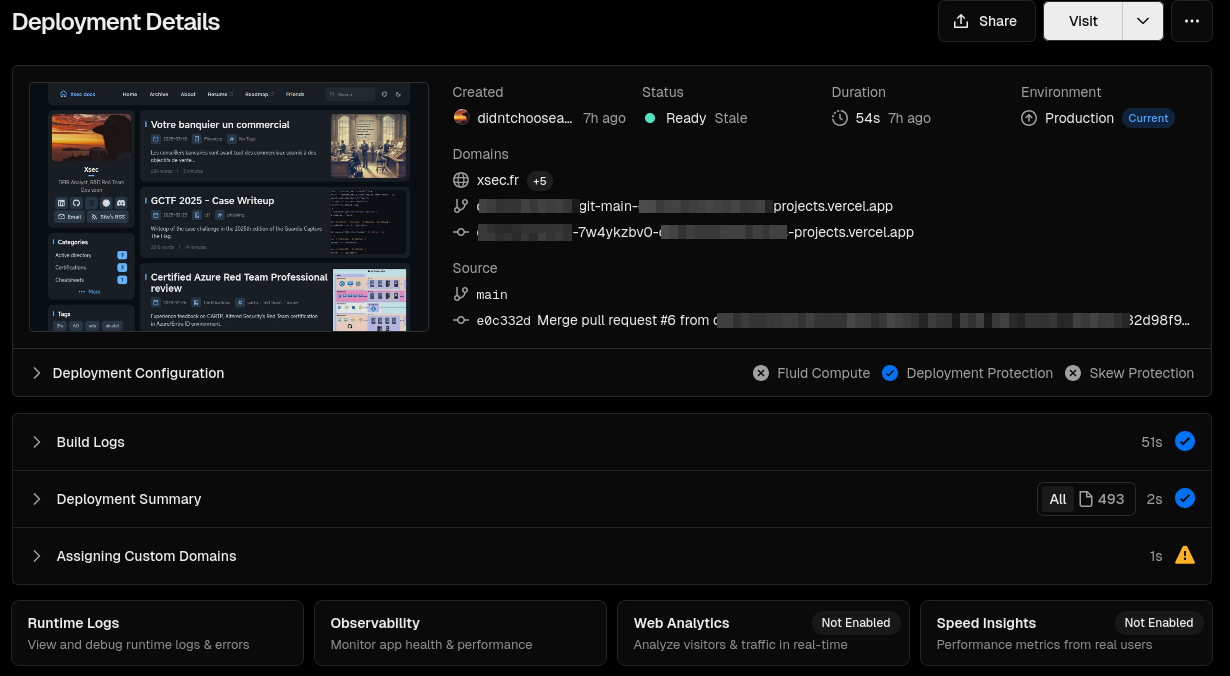
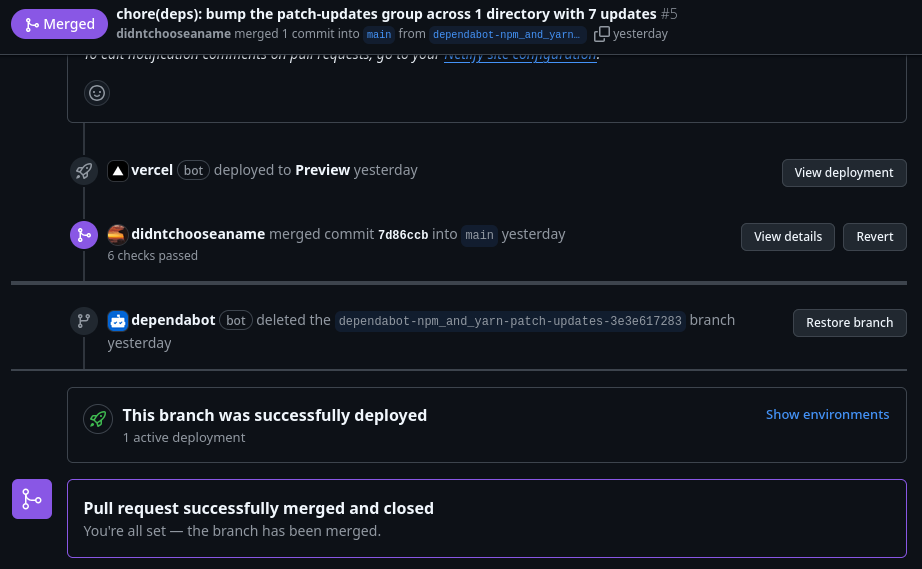
This setup ensures that dependency updates are reviewed and create a pull request with vercel preview, keeping your project secure and up-to-date without modifying files yourself and have a live and automated preview of the website with the modifications by dependabot :
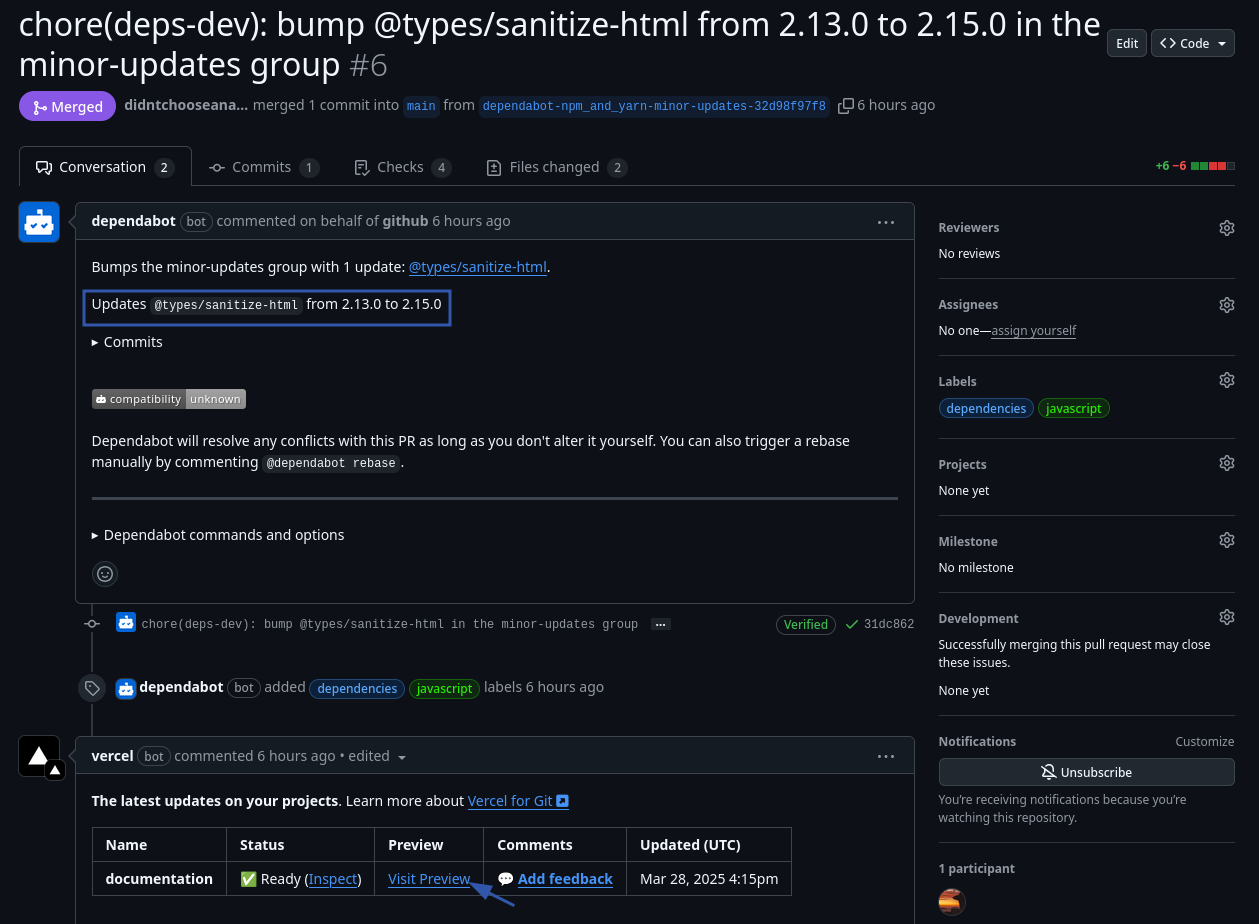
Preview of a commit in vercel, you have a domain name provided for free `vercel.app` and special subdomains assigned to each commits, that way you can have preview of the project at specific time/commit as well as rollbacks :
You can merge or resolve conflict directly at the bottom of the pull request.
## Benefits of This Automated Workflow
This setup offers numerous advantages :
### 1. Simplified Development Process
- Make changes to your code, commit, and push - everything else happens automatically
- No manual FTP uploads or build processes to manage
- Preview deployments for each pull request allow for easy review and testing
### 2. Enhanced Performance and Security
- Cloudflare's global CDN caches your static content close to users
- Automatic SSL/TLS certificate management ensures your site is always secure
- Additional Cloudflare security features protect against DDoS attacks and other threats
### 3. Improved Collaboration and Quality Control
- Pull request previews facilitate team reviews before changes go live
- Automatic branch deployments encourage feature-based development
- Easy rollbacks if something goes wrong
### 4. Cost Efficiency
- Vercel's free tier includes generous limits (200 websites, 6000 build minutes/month, 100GB bandwidth)
- Cloudflare offers free DNS and basic security features
- Pay only when you need more resources or advanced features, free plan is enough for a pesonal website
## Troubleshooting Common Issues
### DNS Configuration Problems
If your domain doesn't connect properly:
Verify that you've updated your nameservers at your domain registrar
Check that your A and CNAME records are correctly configured in Cloudflare
Ensure proxy status is turned OFF for the Vercel records in Cloudflare
Allow up to 48 hours for DNS changes to propagate globally
### Deployment Failures
If your Vercel deployments fail:
Check the build logs in Vercel dashboard
Verify that your build command is correct
Ensure all dependencies are properly listed in your package.json
Test the build process locally before pushing
## Conclusion
By combining tools like GitHub, Vercel, Cloudflare, Astrojs, pnpm, and Dependabot, you can create a seamless automated workflow that simplifies the development and deployment of static websites while ensuring optimal performance and security.
This approach not only saves time but also allows you to focus on building great content without worrying about infrastructure or manual deployments! With Dependabot integrated into the workflow, keeping dependencies secure and up-to-date becomes effortless - ensuring your project remains robust against vulnerabilities while maintaining excellent performance standards.