# LAYER 2 Vlan, Spanning-tree, Trunk, EtherChannel, and Dot1Q Encapsulation
> Overview of the most commonly used Layer 2 features on cisco equipment.
Published on 2021-09-14 | Updated on 2025-01-12 | Tags: cisco, switching
https://xsec.fr/en/networking/layer-2/
---
import Callout from '@shared/components/Callout.astro'
## VLANs
VLANs allow a switch to be divided into multiple parts.
- Enhanced security, management, lower costs.
- Limits broadcast domain > better performance.
There are two ways to create a VLAN:
```txt title="Switch(config)#"
vlan 10
```
Create VLAN 10.
```txt title="Switch(config)" showLineNumbers=false frame="terminal"
int f0/1
```
```txt title="Switch(config-if)#" showLineNumbers=false frame="terminal"
switchport access vlan 10
% Access VLAN does not exist. Creating vlan 10
```
The `f0/1` interface now has access to VLAN 10.
The `no` prefix allows you to delete a VLAN:
```txt title="Switch(config)" showLineNumbers=false frame="terminal"
no vlan 10
```
## Spanning-tree
The spanning-tree prevents broadcast loops and assigns a path cost and priority to each VLAN.
It organizes an election based on each device’s **BIDs** (bridge ID) and MAC addresses.
The lower the value, the higher the chance of the switch being elected as the "root bridge."
The root bridge must be traversed to exit the local network.
You can set the priority of a VLAN:
```txt title="Switch(config)#" showLineNumbers=false frame="terminal"
spanning-tree vlan 10 priority 8000
% Bridge Priority must be in increments of 4096.
% Allowed values are:
0 4096 8192 12288 16384 20480 24576 28672
32768 36864 40960 45056 49152 53248 57344 61440
```
The BID must be one of the values listed above (power of 2).
- You can force a VLAN to use a specific "root bridge," regardless of BID:
```txt title="Switch(config)#" showLineNumbers=false frame="terminal"
spanning-tree vlan 10 root primary
```
- If the root bridge fails, a backup can take over:
```txt title="Switch(config)#" showLineNumbers=false frame="terminal"
spanning-tree vlan 10 root secondary
```
## Trunk
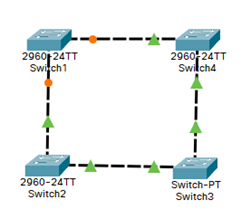
The trunk allows one or more VLANs to be transmitted between multiple devices.
It effectively adds more ports to the primary switch.
Physical View | Logical View
-- | --
 | 
To configure a trunk link, configure the interface (the port) with these commands:
```txt title="Switch(config)#" showLineNumbers=false frame="terminal"
int f0/1
```
```txt title="Switch(config-if)#" showLineNumbers=false frame="terminal"
switchport mode trunk
```
If the configured devices are recent, the device on the other side of the trunk link can detect this link and configure itself automatically.
## EtherChannel/PortChannel
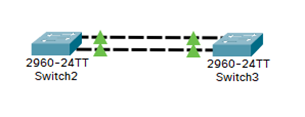
EtherChannel enables link aggregation (up to 8 links).
This increases bandwidth and provides redundancy/fault tolerance.
- Select the interface range:
```txt title="Switch(config)#" showLineNumbers=false frame="terminal"
int range f0/1-2
```
- Create EtherChannel link #1 on the interfaces:
```txt title="Switch(config-if-range)#" showLineNumbers=false frame="terminal"
channel-group 1 mode on
```
Here, "mode on" indicates manual mode.
You need to repeat these commands on the second switch.
**Both physical links are treated as a single logical link: EtherChannel #1.**
## Dot1Q Encapsulation
Encapsulation allows multiple VLANs to be routed over a single physical link.
The router **tags frames** to identify VLANs.
To do this, "sub-interfaces" need to be created.
```txt title="Router(config)#" showLineNumbers=false frame="terminal"
int g0/0/0.10
```
- Encapsulate frames for VLAN 10, according to **IEEE 802.1Q** standard.
```txt title="Router(config-subif)#" showLineNumbers=false frame="terminal"
encapsulation dot1Q 10
```
- Define the IP address of the LAN interface for the specified VLAN.
```txt title="Router(config-subif)#" showLineNumbers=false frame="terminal"
ip address 192.168.10.1 255.255.255.0
```
- 192.168.10.1 is the gateway for devices on VLAN 10.
**Don't forget to enable the physical interface: g0/0/0**
If you have multiple VLANs to configure, the commands are the same.
Just adapt them for your configuration.
Example of configuring Dot1Q encapsulation for VLAN 20:
```txt title="Router(config)#" showLineNumbers=false frame="terminal"
int g0/0/0.20
```
```txt title="Router(config-subif)#" showLineNumbers=false frame="terminal"
encapsulation dot1Q 20
```
```txt title="Router(config-subif)#" showLineNumbers=false frame="terminal"
ip address 192.168.20.1 255.255.255.0
```
**Don't forget to enable the physical interface: g0/0/0**
### Dot1Q Command Summary
Copy/paste these lines (adapting to your configuration) into your terminal:
```txt title="Terminal" showLineNumbers=false frame="terminal"
conf t
int g0/0/0.10
encapsulation dot1Q 10
ip address 192.168.10.1 255.255.255.0
no shut
```