# LAYER 3 Static Routing, RIPv2, OSPF, NAT
> Key Layer 3 functionalities on cisco equipment.
Published on 2021-09-14 | Updated on 2025-03-23 | Tags: cisco, routing
https://xsec.fr/en/networking/layer-3/
---
import Callout from '@shared/components/Callout.astro'
import { Collapsible } from '@shared/components/ui/collapsible'
import { Steps, Step } from '@/components/ui/steps'
## Loopback Interface
The loopback interface is virtual and serves as a backup SSH connection for all ports on the network device.
It also allows for identifying the next router in a multi-area OSPF routing protocol.
In an interconnected network, the loopback interface provides a backup route to reach the desired device.
This interface acts as a VLAN, forming a network separate from other known networks on the router.
```txt title="Router(config)#"
interface loopback 0
```
A notification indicates that the loopback interface is now UP:
```txt title="Terminal"
%LINK-5-CHANGED: Interface Loopback0, changed state to up
%LINEPROTO-5-UPDOWN: Line protocol on Interface Loopback0, changed state to up
```
```txt title="Router(config-if)#"
ip address 1.1.1.1
ip address 2.2.2.2
```
Since this is a separate network, configure routing on both devices (static in this example):
```txt title="Router(config)#"
ip route 2.2.2.0 255.255.255.0 192.168.1.2
ip route 1.1.1.0 255.255.255.0 192.168.1.1
```
```txt title="Router#"
Router1# ping 2.2.2.2
```
## Static Routing

To communicate with another network (i.e., with a different addressing scheme), establish a route between the routers:
```txt title="Router(config)#"
ip route 10.10.10.0 255.255.255.0 172.16.1.1
```
Destination network with subnet mask | Next-hop (next node)
`192.168.1.0 255.255.255.0` | `172.16.1.1`
`Next-hop` represents the path for packet forwarding.
Similarly, configure a route for the second router in the opposite direction.
```txt title="Router(config)#"
ip route 192.168.1.0 255.255.255.0 172.16.1.2
```
To reach the `192.168.1.0 255.255.255.0` network, go through `172.16.1.2`.
The `Router#show ip route` command displays known routes, including all active routing protocols and shared networks.
```txt title="Router#"
show ip route
Codes: L - local, C - connected, S - static, R - RIP, M - mobile, B - BGP
D - EIGRP, EX - EIGRP external, O - OSPF, IA - OSPF inter area, N1 - OSPF NSSA external type 1,
N2 - OSPF NSSA external type 2, E1 - OSPF external type 1, E2 - OSPF external type 2
i - IS-IS, su - IS-IS summary, L1 - IS-IS level-1, L2 - IS-IS level-2, ia - IS-IS inter area,
* - candidate default, U - per-user static route, o - ODR, P - periodic downloaded static route
C 192.168.1.0/24 is directly connected, FastEthernet0/0
S 10.10.10.0/24 [1/0] via 172.16.1.1
```
`S` for static routes.
There is also a **default static route**
`0.0.0.0 0.0.0.0 IP_NEXT_HOPE`
Any unknown networks will be forwarded to `Next-Hope`.
## Dynamic Routing
### RIPv2
RIPv2 is an example of a dynamic distance-vector routing protocol.
It enables multiple routers to communicate and **announce the networks** they know.
Routers update their routing tables (every 30 seconds) based on RIP requests they receive.
RIPv2 takes into account **cost** as a metric.
"How many hops will it take to reach my target?"
This is the question the router evaluates.
It will choose the route with the lowest cost.
When discussing **cost**, the same principle applies to other routing protocols.
Set interfaces not pointing to another router as passive.
**This limits RIP v2 traffic to networks between routers, reducing network load and attack surface.**
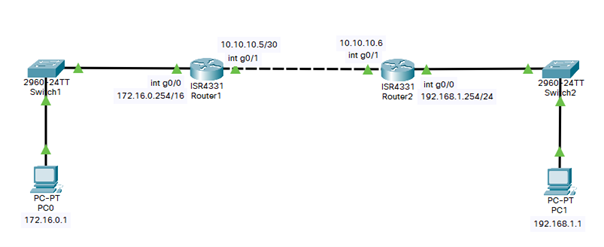
```txt title="R1(config)#"
R1(config)#router rip
```
```txt title="R1(config)#"
R1(config)#version 2
```
```txt title="R1(config-router)#"
R1(config-router)#network 10.10.10.0
R1(config-router)#network 172.16.0.0
```
The g0/0/0 interface on router 1 does not point to a router.
```txt title="R1(config-router)#"
R1(config-router)#passive-interface g0/0/0
```
Follow the same steps for router 2 (adjust the networks that the router announces accordingly).
#### RIPv2 Command Summary
Copy and paste these lines (adjust your configuration) directly into your terminal:
```txt title="Terminal"
conf t
router rip
version 2
network 10.10.10.0
network 172.16.1.0
passive-interface g0/0/0
```
### OSPF
OSPF is an example of a **link-state** routing protocol.
It organizes routers into "areas" for its configuration.
The **BGP** routing protocol collects routing tables from all dynamic routing protocols. It is used by internet service providers.
All routers within an OSPF area must have the same area ID to become OSPF neighbors.
Four key elements for a minimal OSPF configuration:
```txt title="Router(config)#"
router ospf 1
```
```txt title="Router(config-router)#"
router-id 1.1.1.1
```
```txt title="Router(config-router)#"
passive-interface g0/0/0
```
1 network per router interface, including sub-interfaces.
It’s essential to announce networks using their network address and wildcard mask (inverse mask).
CIDR | Mask | Wildcard Mask
--- | --- | ---
/32 | 255.255.255.255 | 0.0.0.0
/31 | 255.255.255.254 | 0.0.0.1
/30 | 255.255.255.252 | 0.0.0.3
/29 | 255.255.255.248 | 0.0.0.7
/28 | 255.255.255.240 | 0.0.0.15
/27 | 255.255.255.224 | 0.0.0.31
/26 | 255.255.255.192 | 0.0.0.63
/25 | 255.255.255.128 | 0.0.0.127
/24 | 255.255.255.0 | 0.0.0.255
/23 | 255.255.254.0 | 0.0.1.255
/22 | 255.255.252.0 | 0.0.3.255
/21 | 255.255.248.0 | 0.0.7.255
/20 | 255.255.240.0 | 0.0.15.255
/19 | 255.255.224.0 | 0.0.31.255
/18 | 255.255.192.0 | 0.0.63.255
/17 | 255.255.128.0 | 0.0.127.255
/16 | 255.255.0.0 | 0.0.255.255
/15 | 255.254.0.0 | 0.1.255.255
/14 | 255.252.0.0 | 0.0.3.255
/13 | 255.248.0.0 | 0.7.255.255
/12 | 255.240.0.0 | 0.0.15.255
/11 | 255.224.0.0 | 0.0.31.255
/10 | 255.192.0.0 | 0.0.63.255
/9 | 255.128.0.0 | 0.0.127.255
/8 | 255.0.0.0 | 0.0.255.255
/7 | 254.0.0.0 | 1.255.255.255
/6 | 252.0.0.0 | 3.255.255.255
/5 | 248.0.0.0 | 7.255.255.255
/4 | 240.0.0.0 | 15.255.255.255
/3 | 224.0.0.0 | 31.255.255.255
/2 | 192.0.0.0 | 63.255.255.255
/1 | 128.0.0.0 | 127.255.255.255
/0 | 0.0.0.0 | 255.255.255.255
```txt title="Router(config-router)#"
network 192.168.1.0 0.0.0.255 area 0
network 10.20.30.40 0.0.0.3 area 0
```
`192.168.1.0/24` is the LAN network.
`10.20.30.40/30` is the point-to-point network between the two routers.
View OSPF neighbors with the command:
```txt title="Router#"
show ip ospf neighbor
Neighbor ID Pri State Dead Time Address Interface
192.168.1.0 1 2WAY/DROTHER 00:00:32 192.168.1.0 GigabitEthernet0/1
10.20.30.40 1 2WAY/DROTHER 00:00:32 10.20.30.40 GigabitEthernet0/2
```
- Set route cost manually (in units of 1):
```txt title="Router(config-router)#"
auto-cost reference-bandwidth 1000
```
#### OSPF Command Summary
Copy and paste these lines (adjust your configuration) directly into your terminal:
```txt
conf t
router ospf
router-id 1.1.1.1
network 192.168.1.0 0.0.0.255 area 0
network 10.20.30.40 0.0.0.3 area 0
```
The example above shows the configuration for a router with one leg in a LAN and another in the /30 network pointing to the next router.
To limit routing table exchanges to necessary interfaces, it's recommended (for network optimization and security) to set LAN interfaces to **passive mode** so they don't listen to routing traffic.
```txt title="Router(config-router)#"
passive-interface g0/0/0
```
### Multi-area OSPF
**Coming soon...**
## Dynamic NAT
---
```txt title="Router(config)#"
int g0/0/0
ip nat inside
```
```txt title="Router(config)#"
int g0/0/1
ip nat outside
```
```txt title="Router(config)#"
access-list 1 permit 192.168.0.0 0.0.0.255
```
`0.0.0.255` is the wildcard mask.
```txt title="Router(config)#"
ip nat pool MY_POOL 10.10.10.1 10.10.10.1 netmask 255.255.255.0
```
- `10.10.10.0` corresponds to the WAN network
- `10.10.10.1` to `10.10.10.x` defines an IP address range
- If there is only one interface: `10.10.10.1` `10.10.10.1`
```txt title="Router(config)#"
ip nat inside source list 1 pool MON_POOL overload
```
OR
```txt
ip nat inside source list 1 interface g0/0/1 overload
```