Active Directory multi-sites, network shares and user rights management
Published on 30 min read
Updated on
In this series52 min read in total
- Installing a Windows Server with AD DS Role (Domain Controller)
- Active Directory multi-sites, network shares and user rights management
- Apply quota on network shared directories
This lab takes a freshly installed domain controller and turns it into a complete corporate directory: three sites, six departments, compartmentalised network shares, drives mounted automatically at logon, and profiles that follow the user from machine to machine.
Installing the AD DS role is the prerequisite and is covered in Installing a Windows Server with AD DS Role. We pick up right after the first reboot of the SDE.LOCAL domain controller.
The context: three sites, one directory
The company has 3 sites, each with one Windows server:
SRV-CHAin Chassignieu, the headquarters, carrying the AD DS role and therefore acting as the domain controller.SRV-VIRin Virieu, a file server.SRV-BLAin Blandin, a file server.
Each site contains 2 departments, Administrative and Technical. The headquarters contains a third one, Management.
All 3 servers belong to the same SDE.LOCAL domain: there is a single directory, hence a single place to create accounts and groups. What stays local to each site is the data, not the identities.
Three requirements follow from this organization, and they drive everything else in this lab:
- Compartmentalise: a technician in Virieu must not see the Management folders, nor even know they exist.
- Share in common: some folders must stay reachable from all sites, from a single location.
- Make the user mobile: their documents and their desktop must follow them, whichever machine they log on to.
The first requirement is the tricky one. So before clicking anywhere in the console, we need the rule that decides who reaches what.
The method: the AGDLP model
The natural temptation is to put a user straight onto a folder: right-click, Security, Add, PDG, Full Control. It works on day one and becomes unmanageable on day two. Every arrival, departure or transfer forces you to reopen every affected folder to edit its access control list, and you can never simply answer the question “what does this user have access to?”.
The AGDLP model solves this by inserting two levels of groups between the account and the folder:
| Letter | Active Directory object | What it represents | Example in this lab |
|---|---|---|---|
| A | Account | the user’s account | PDG |
| G | Global group | who the person is, their department | GG-CHA-DIR |
| DL | Domain Local group | which right on which resource | GL-SRV-CHA-DATA-MANAGEMENT-FC |
| P | Permission | the NTFS entry actually applied | Full Control on the Management folder |
The chain reads left to right: the account goes into a global group, the global group goes into a domain-local group, and that last one, and only that one, ever appears on the Security tab of a folder.
PDG → GG-CHA-DIR → GL-SRV-CHA-DATA-MANAGEMENT-FC → Full Control on \\SRV-CHA\DATA-CHA$\Management A G DL PThe benefit shows up as soon as something changes:
- A new hire in Management? One single action, add them to
GG-CHA-DIR. They instantly inherit every Management folder. - A new folder to secure? One single domain-local group to create, then nest into the relevant global groups. No account is touched.
- An audit? The members of a domain-local group answer “who reaches this folder”, the memberships of a global group answer “what does this person reach”.
The model has a cost: it multiplies objects. With nine folders to protect and two possible right levels, you quickly reach a dozen or so domain-local groups. They are only usable if their names can be read without documentation.
A naming convention that reads itself
Each name encodes everything needed to know what the group is for, without opening the console.
For global groups, two segments are enough, since they only describe people:
| Segment | Example | Meaning |
|---|---|---|
GG | GG | global group, it holds accounts |
| site | CHA | Chassignieu, Virieu (VIR) or Blandin (BLA) |
| department | DIR | Management, Administrative (ADM) or Technical (TECH) |
Which gives GG-CHA-DIR, GG-VIR-ADM, GG-BLA-TECH, and so on.
For domain-local groups, the resource and the right level must be described as well:
| Segment | Example | Meaning |
|---|---|---|
GL | GL | domain-local group, it carries a right |
| server | SRV-CHA | machine physically hosting the folder |
| share | DATA | name of the network share on that machine |
| folder | ADM-COMMON | the exact subfolder targeted |
| right | FC | Full Control, or R for Read |
Which gives GL-SRV-CHA-DATA-ADM-COMMON-R: read access to the Adm-Common folder of the DATA share hosted by SRV-CHA.
With that convention in place, the full directory plan can now be read at a glance.
The plan to build
Organizational units
Organizational units (OU) are containers that mirror the org chart inside the directory. Here, one level per site, then one level per department.
Each department OU holds its global group and the accounts that belong to it. The domain-local groups live in their own sub-OU (here GL-Direction) so they never get mixed up with the objects that describe people.
Shares and their domain-local groups
On the data side, each server exposes a DATA share split into subfolders, plus two technical shares covered later: DBASE for home folders and PROFILS for roaming profiles.
The split follows two complementary logics. Folders suffixed Common all live on SRV-CHA and are reachable from the three sites: this is the pooling point. Folders suffixed with a town name live on their own site’s server: this is the partitioning, which keeps data local to the users who work with it.
The table below sums up the target to build, one domain-local group per (folder, right level) pair:
| Folder | Server | Full Control group | Read group |
|---|---|---|---|
DATA-CHA\Management | SRV-CHA | GL-SRV-CHA-DATA-MANAGEMENT-FC | none |
DATA-CHA\Adm-Common | SRV-CHA | GL-SRV-CHA-DATA-ADM-COMMON-FC | GL-SRV-CHA-DATA-ADM-COMMON-R |
DATA-CHA\Tech-Common | SRV-CHA | GL-SRV-CHA-DATA-TECH-COMMON-FC | none |
DATA-CHA\Adm-Chassignieu | SRV-CHA | GL-SRV-CHA-DATA-ADM-CHASSIGNIEU-FC | GL-SRV-CHA-DATA-ADM-CHASSIGNIEU-R |
DATA-CHA\Tech-Chassignieu | SRV-CHA | GL-SRV-CHA-DATA-TECH-CHASSIGNIEU-FC | none |
DATA-VIR\Adm-Virieu | SRV-VIR | GL-SRV-VIR-DATA-ADM-VIRIEU-FC | GL-SRV-VIR-DATA-ADM-VIRIEU-R |
DATA-VIR\Tech-Virieu | SRV-VIR | GL-SRV-VIR-DATA-TECH-VIRIEU-FC | none |
DATA-BLA\Adm-Blandin | SRV-BLA | GL-SRV-BLA-DATA-ADM-BLANDIN-FC | GL-SRV-BLA-DATA-ADM-BLANDIN-R |
DATA-BLA\Tech-Blandin | SRV-BLA | GL-SRV-BLA-DATA-TECH-BLANDIN-FC | none |
Create the directory objects
The target is set. We now build it in the exact order of the AGDLP chain: containers first, then the global groups (G), then the accounts (A), and finally the domain-local groups (DL). All four steps happen in the same console, Active Directory Users and Computers.
Step 1: create the organizational units
OUs come first, because everything else, groups and accounts alike, has to be created inside one of them.
Open the Active Directory Users and Computers console
On the
SRV-CHAdomain controller, open the Server Manager Tools menu and launch Active Directory Users and Computers. This is the console where nearly all of steps 1 to 4 take place.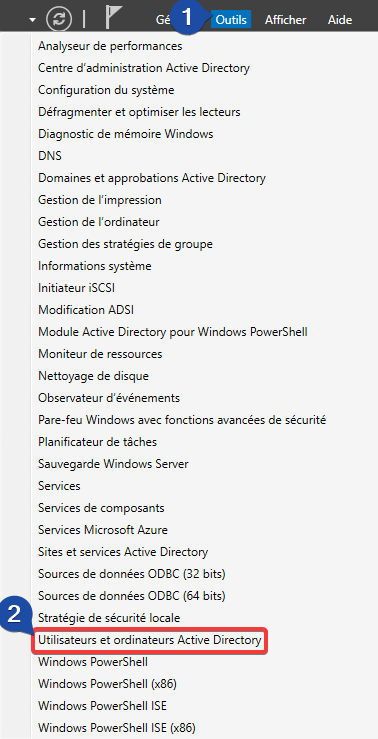
Create the top-level OU
In the console tree, right-click the
SDE.LOCALdomain, then select New followed by Organizational Unit. Right-clicking an existing OU instead creates a sub-OU: that is how you get the site then department hierarchy.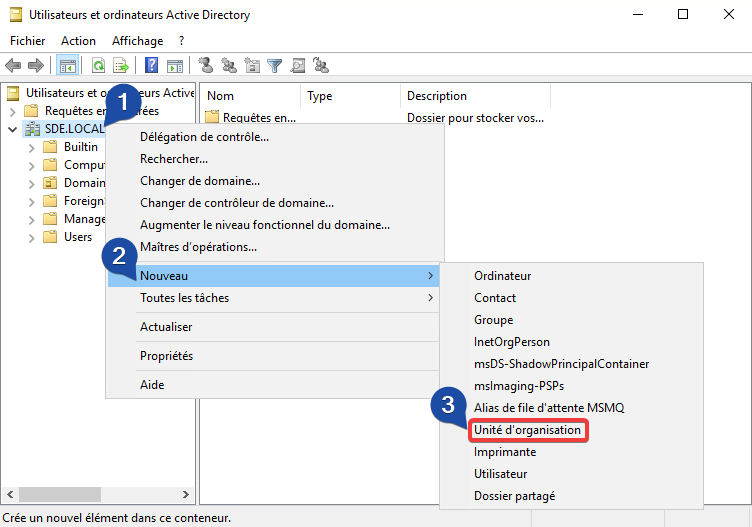
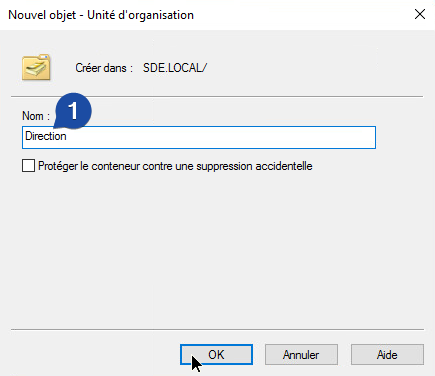
Name the OU and clear the protection
Give the OU a name that matches the site or department, then confirm with OK.
Repeat for the whole tree
Repeat until you have the 3 site OUs, their 7 department sub-OUs, and the
GL-Directionsub-OU meant for the domain-local groups.
The containers exist and they are empty. The global groups go in first, because they will receive the accounts created right after.
Step 2: create the global groups (the G)
A global group represents one department on one site. It carries no right: it only gathers people who, by definition, share the same access needs.
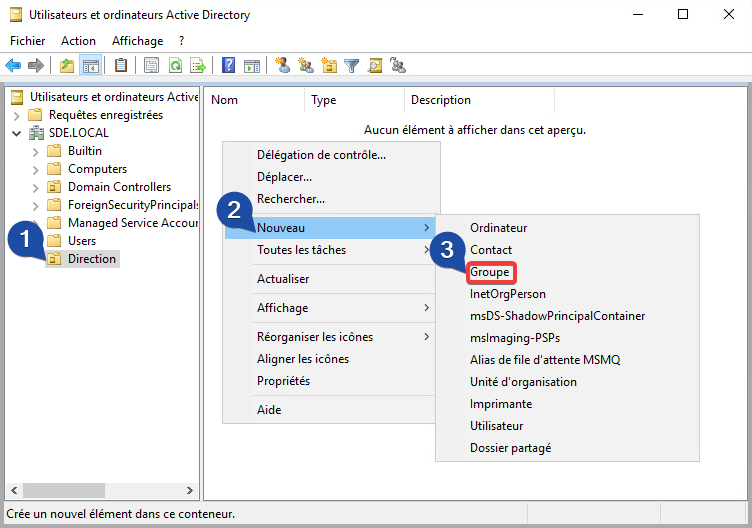
Create the group inside the department OU
Inside the department’s OU, right-click and select New then Group. Creating the group from the target OU avoids having to move it afterwards.
Name the group and pick the Global scope
Type the group name using the
GG-<site>-<department>convention, set the scope to Global with a Security type, and click OK.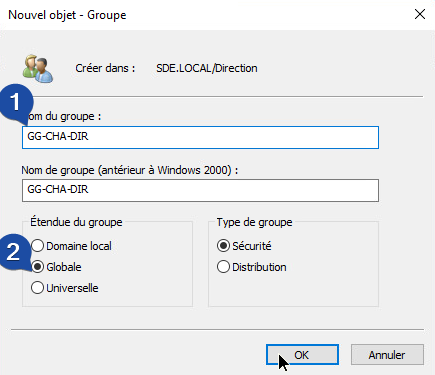
Repeat for the 7 departments
By the end of this step you have
GG-CHA-DIR,GG-CHA-ADM,GG-CHA-TECH,GG-VIR-ADM,GG-VIR-TECH,GG-BLA-ADMandGG-BLA-TECH.
Those groups are still empty, so the accounts that will populate them come next.
Step 3: create the user accounts (the A)
The account is the only object the user really handles: it is what they log on with. Everything else in the chain is invisible to them.
Create the account inside the department OU
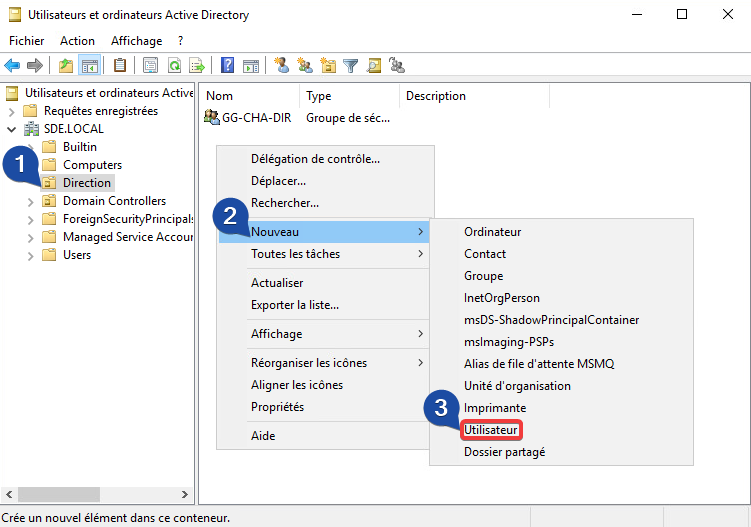
Right-click the same department OU, then select New followed by User.
Fill in the identity and the logon name
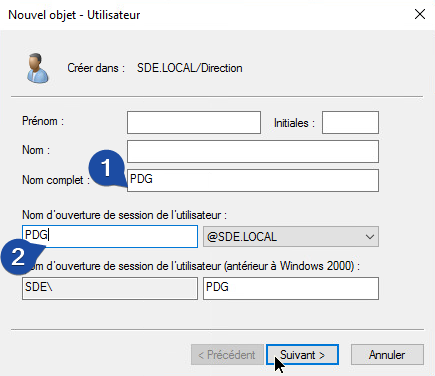
Fill in the full name and the user logon name, then click Next. The logon name is the account’s technical identifier: it must be unique across the domain and stay stable over time, unlike the full name which can change.
Set the password
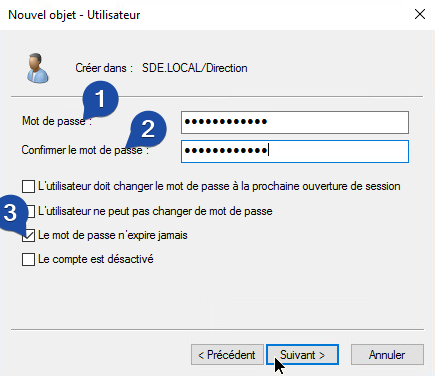
Confirm the password and, for this lab, enable Password never expires before continuing.
Confirm the creation
Review the account summary and click Finish to create the user.
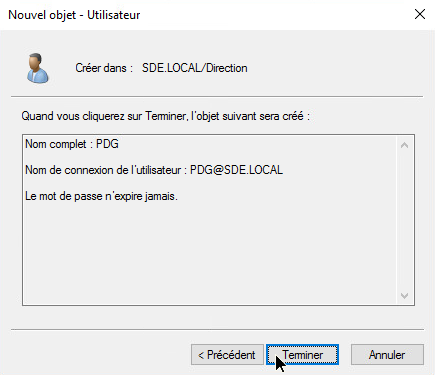
Accounts and global groups are in place: the left half of the AGDLP chain (A and G) is ready. Its right half, the one that describes resources, is still missing.
Step 4: create the domain-local groups (the DL)
A domain-local group is the mirror image of a global group: it does not describe people, it describes a right on a precise resource. It is the only object that will later appear on the Security tab of a folder.
FC stands for Full Control, R stands for Read. These suffixes are only a naming convention: they apply nothing by themselves, the actual right is granted in step 7.
The DATA-CHA share holds one subfolder per scope (common or per-site, administrative or technical), and each one will be secured by its own domain-local group or groups.
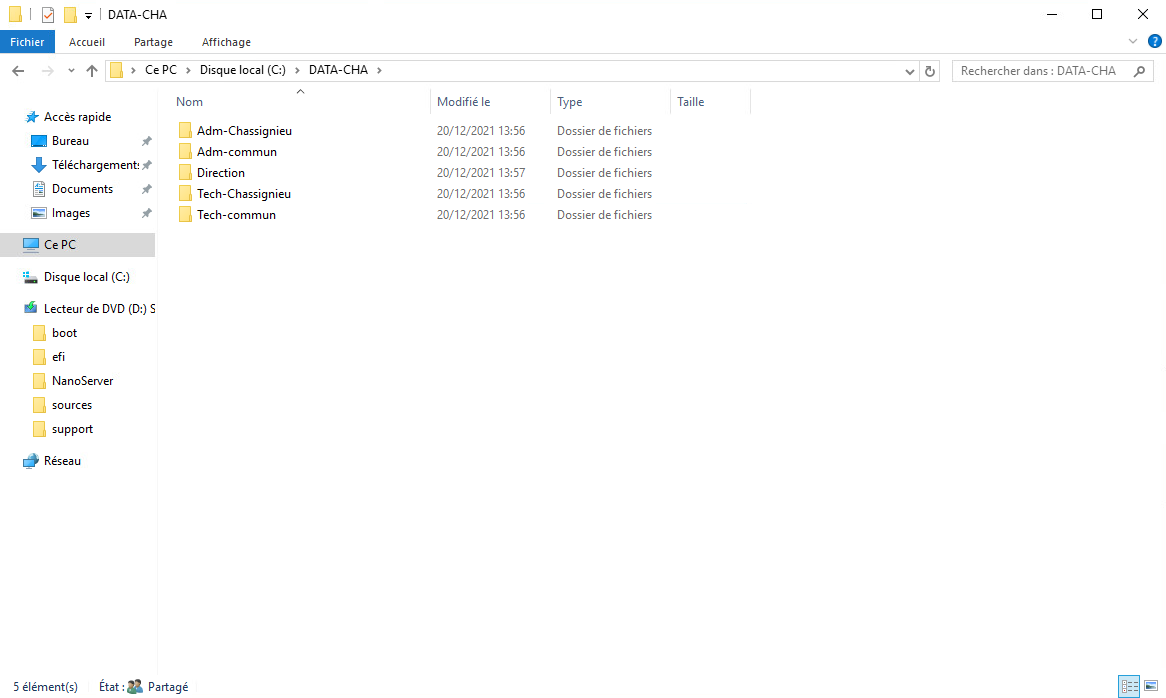
Create the group in the dedicated OU
Inside the
GL-DirectionOU, right-click and choose New then Group.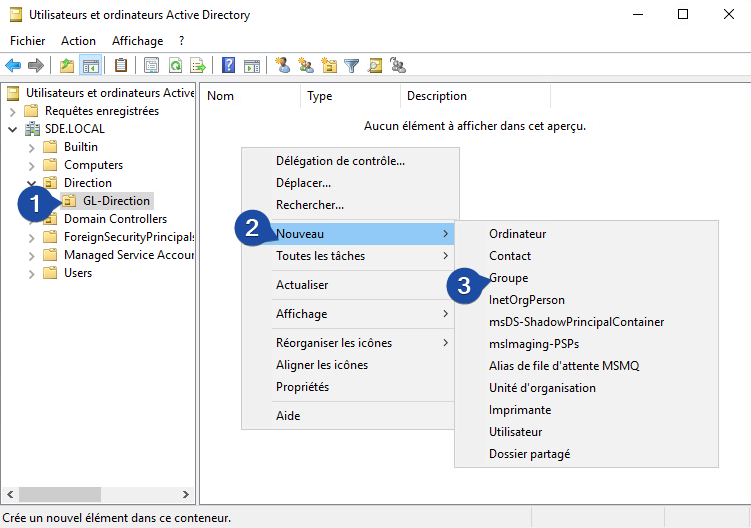
Name the group and pick the Domain local scope
Name the group with the
GL-SRV-<site>-DATA-...convention that encodes the target folder and right level, set the scope to Domain local, and click OK.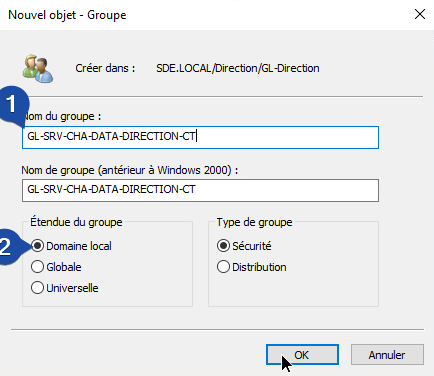
Check the result
The new domain-local group now appears in the
GL-DirectionOU.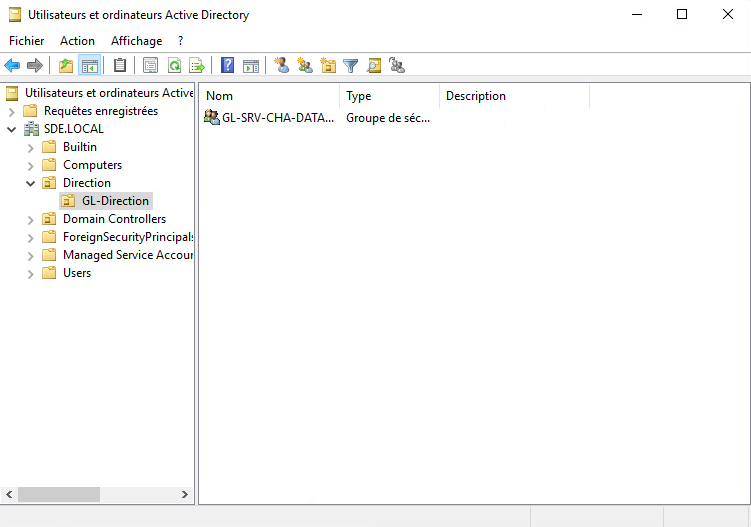
Repeat for every row of the table
Go back to the table in the previous section and create one group per filled cell, 13 domain-local groups in total.
Publish and secure the shares
All four links of the chain now exist as objects, but none of them is connected to the others, and above all no folder is reachable over the network yet. The next three steps therefore happen on the file server side: publish the folders, nest the groups, then apply the permissions.
Step 5: publish the DATA share
An NTFS permission is useless as long as the folder cannot be reached from a client. It has to be published as an SMB share first. This step is also the right moment to understand why Windows stacks two permission systems.
| Layer | Where it is set | Setting used here | Role |
|---|---|---|---|
| Share (SMB) | Sharing tab, Permissions button | Everyone, Full Control | coarse filter, it lets everything through |
| NTFS | Security tab | domain-local groups only | real filter, it decides who gets in |
A user’s effective access is the intersection of both layers: the most restrictive one always wins. Opening the share layer wide therefore weakens nothing, and it concentrates all the rights logic in one place, NTFS. That is what makes the configuration readable and auditable: a single tab to consult to know who reaches what.
Open the folder properties
On the local disk, right-click the
DATA-CHAfolder and open its Properties.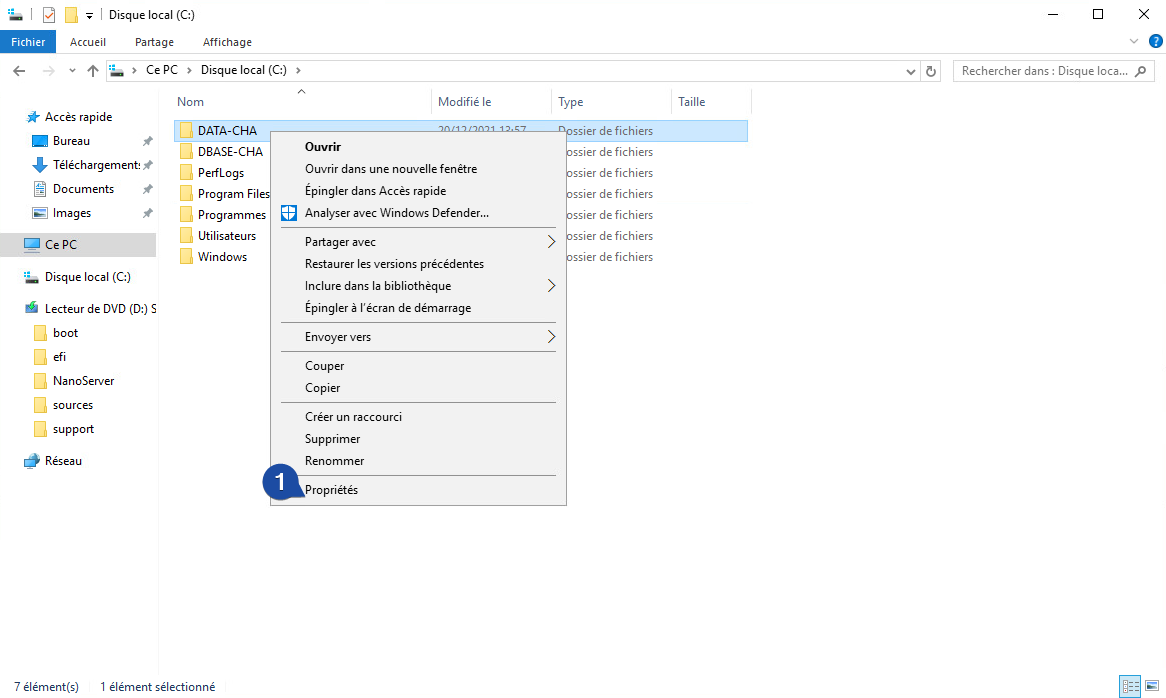
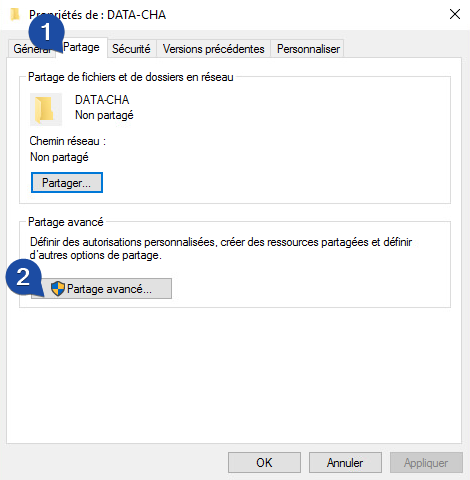
Go through Advanced Sharing
On the Sharing tab, click Advanced Sharing. The Share button just above is a simplified wizard that can neither hide the share nor control its permissions precisely.
Name the share and hide it
Tick Share this folder, enter the share name
DATA-CHA$so the$keeps it hidden, then open Permissions.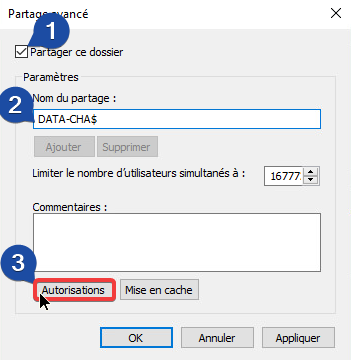
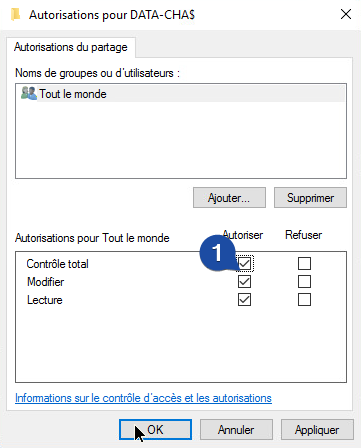
Open the share layer
Grant Full Control to Everyone at the share level, since the NTFS permissions will do the real filtering, and click OK.
Note down the network path
Back on the Sharing tab, the folder is now shared at
\\Srv-cha\data-cha$; close the dialog. Write that path down, it will be reused as is in the logon scripts.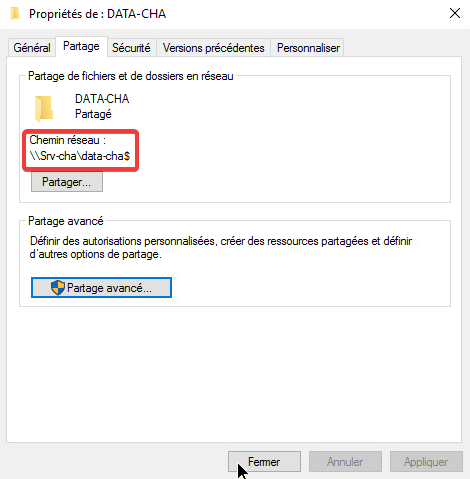
Find the subfolders to secure
Reopening the share shows the subfolders that will each receive their domain-local group.
Repeat the operation on SRV-VIR and SRV-BLA to publish DATA-VIR$ and DATA-BLA$.
Hide what is not accessible
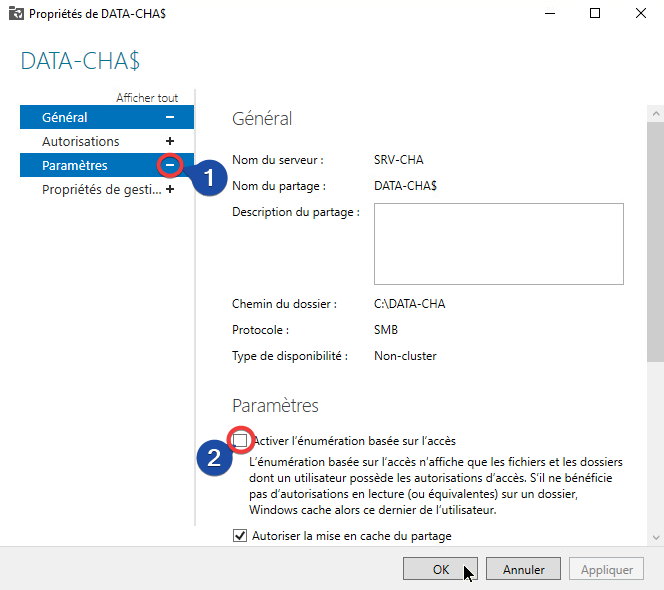
With no further setting, a user opening \\SRV-CHA\DATA-CHA$ sees the full list of subfolders, Management included, and gets an access denied when clicking it. The compartmentalisation works, but it leaks the org chart. Access-based enumeration (ABE) fixes exactly that by filtering the listing itself.
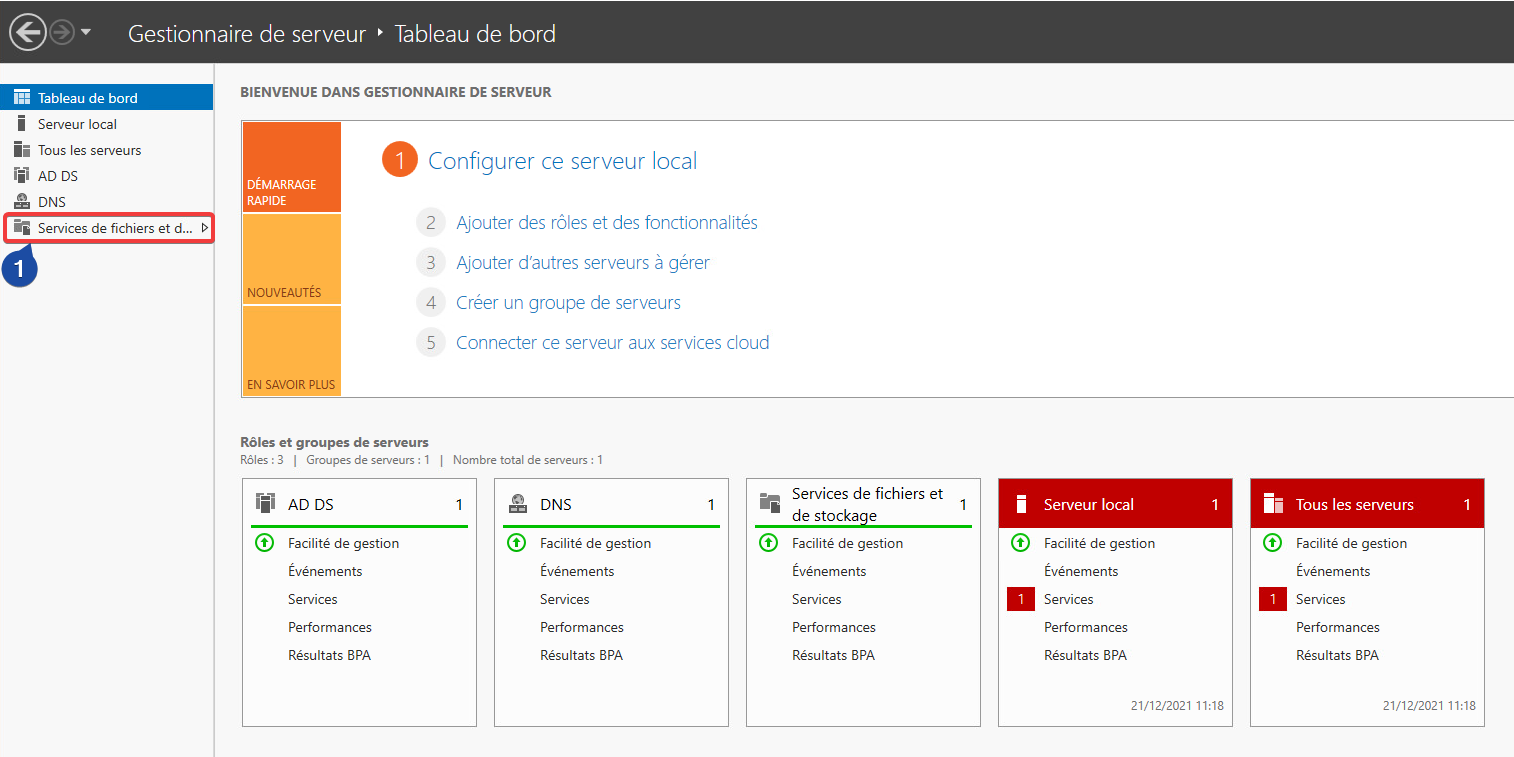
Open File and Storage Services
In Server Manager, open File and Storage Services.
Open the share properties
Under Shares, right-click the
DATA-CHA$share and open its Properties.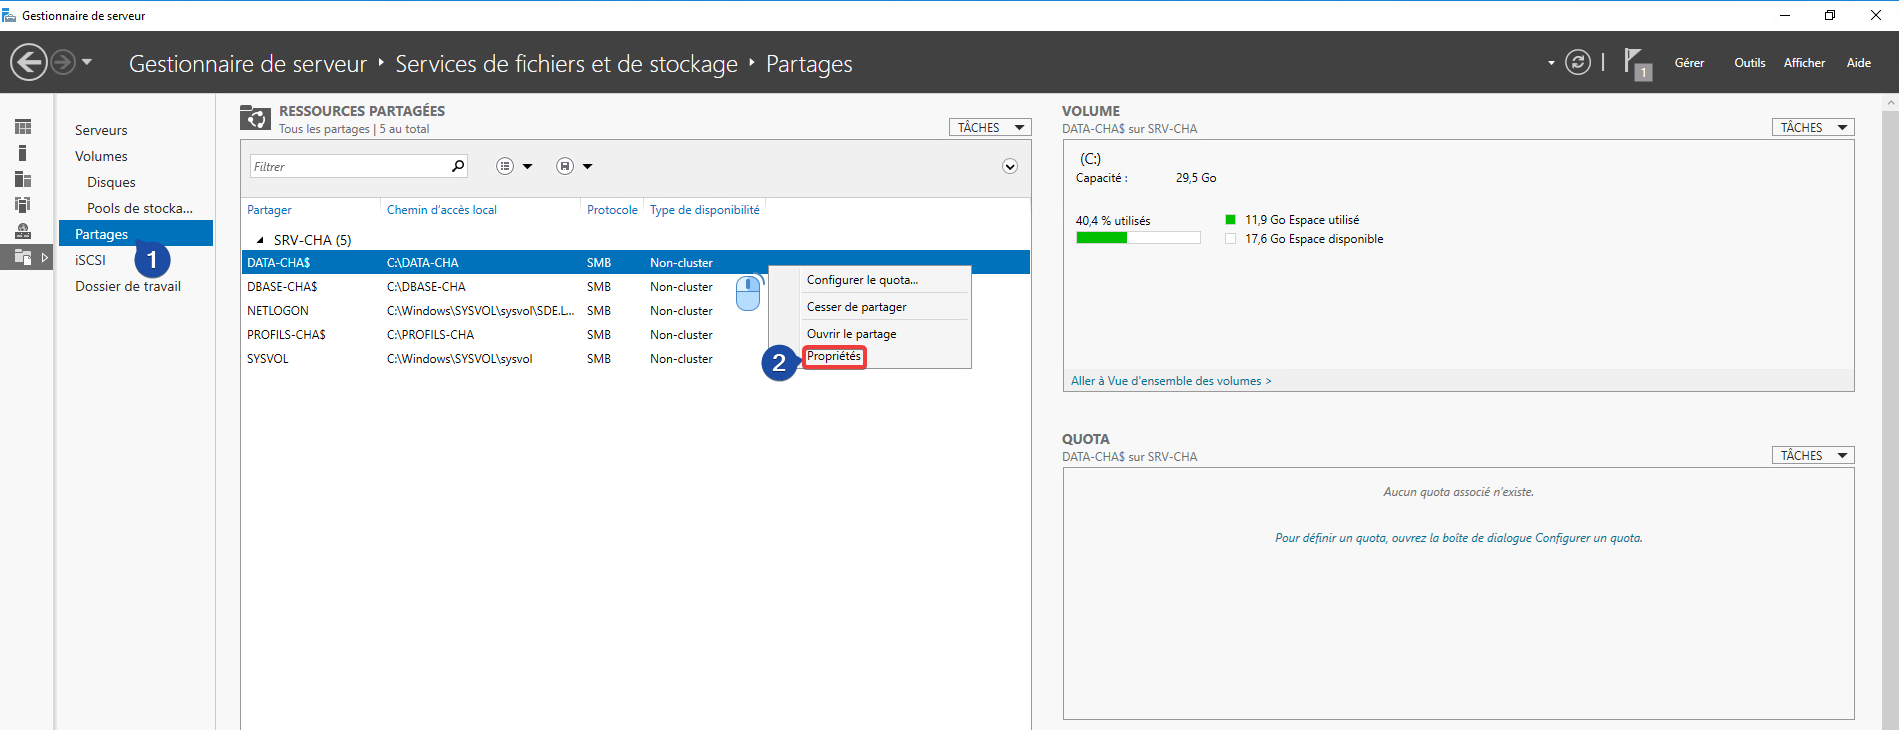
Enable enumeration
In the Settings section, tick the enumeration option and confirm.
The folders are published and ready to filter. What remains is wiring the links of the chain together.
Step 6: wire the AGDLP chain
Two nestings are enough, and their order barely matters as long as both are done: without the first one the user is attached to nothing, without the second one their group leads to no resource.
From the account to the global group (A to G)
Open the global group properties
Right-click the global group (here
GG-CHA-DIR) and open its Properties.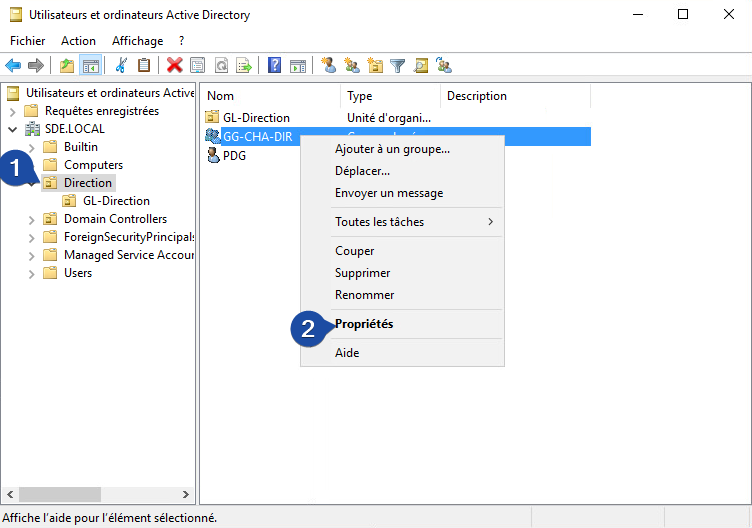
Add the user as a member
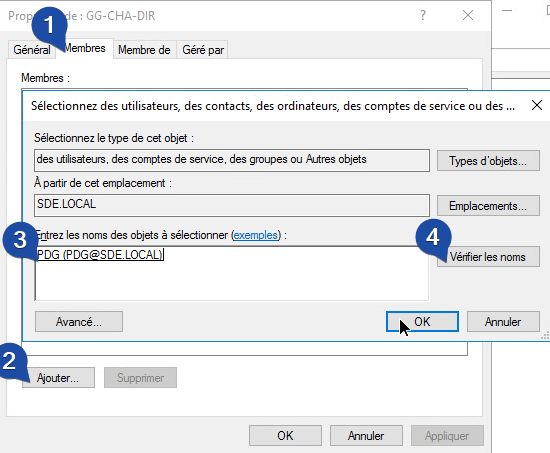
On the Members tab, click Add, enter the user name, resolve it with Check Names, and click OK.
Confirm the membership
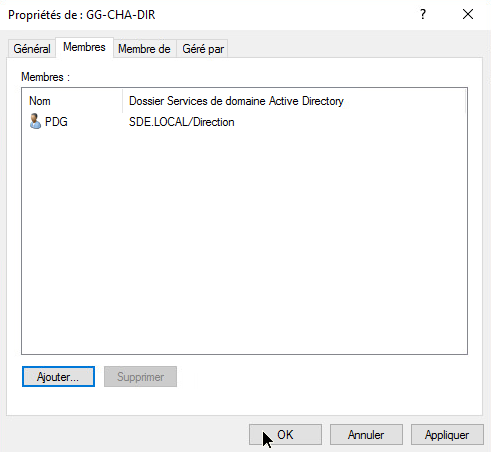
The user now appears in the group’s member list; click OK to save.
From the global group to the domain-local group (G to DL)
Reopen the global group properties
Open the properties of the same global group again.
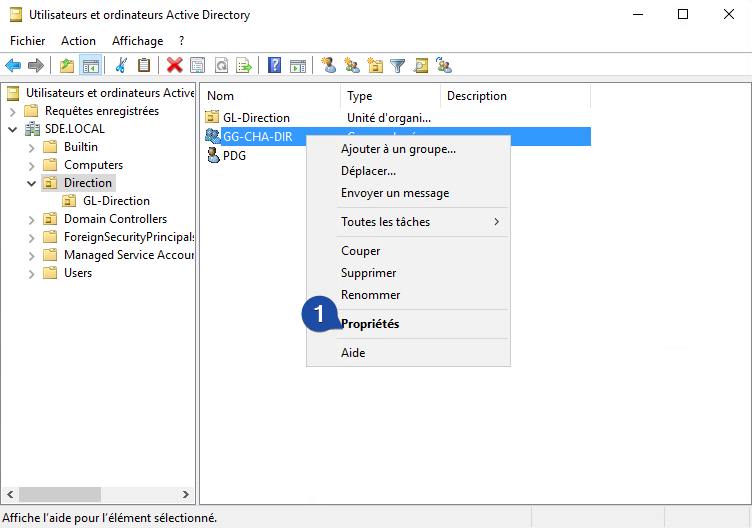
Switch to the Member Of tab
Switch to the Member Of tab and click Add. The Members tab lists what the group contains, the Member Of tab lists what contains the group: the second one is the right one here, since the global group goes into the domain-local group.
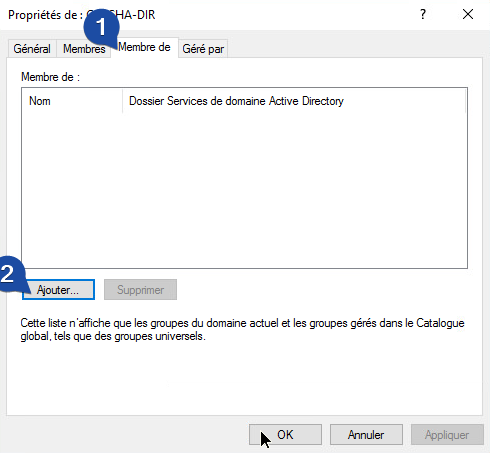
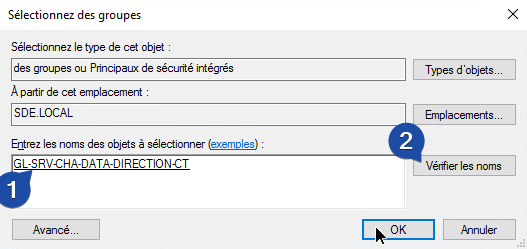
Point at the domain-local group
Enter the domain-local group name, resolve it with Check Names, and click OK.
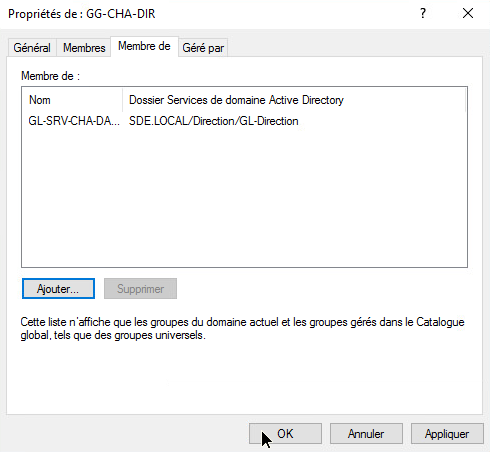
Confirm the nesting
The global group is now a member of the domain-local group; click OK.
The chain is wired end to end, but it still leads nowhere: no domain-local group appears in any folder’s access control list yet. That is the last link, the P.
Step 7: apply the NTFS permissions (the P)
Two mechanisms combine here, and they explain why the procedure is long.
The first one is inheritance: by default a subfolder automatically receives its parent’s permissions. Since C:\DATA-CHA itself inherits from the disk root, the built-in Users group is present there, which would give every domain account read access to Management. That inheritance has to be broken.
The second one is converting inherited permissions into explicit ones: when disabling inheritance, Windows offers to copy the existing entries onto the folder. Take that option, then delete the ones you do not want. It is safer than plain removal, which would leave the folder with no ACL at all and therefore unreachable even for administrators.
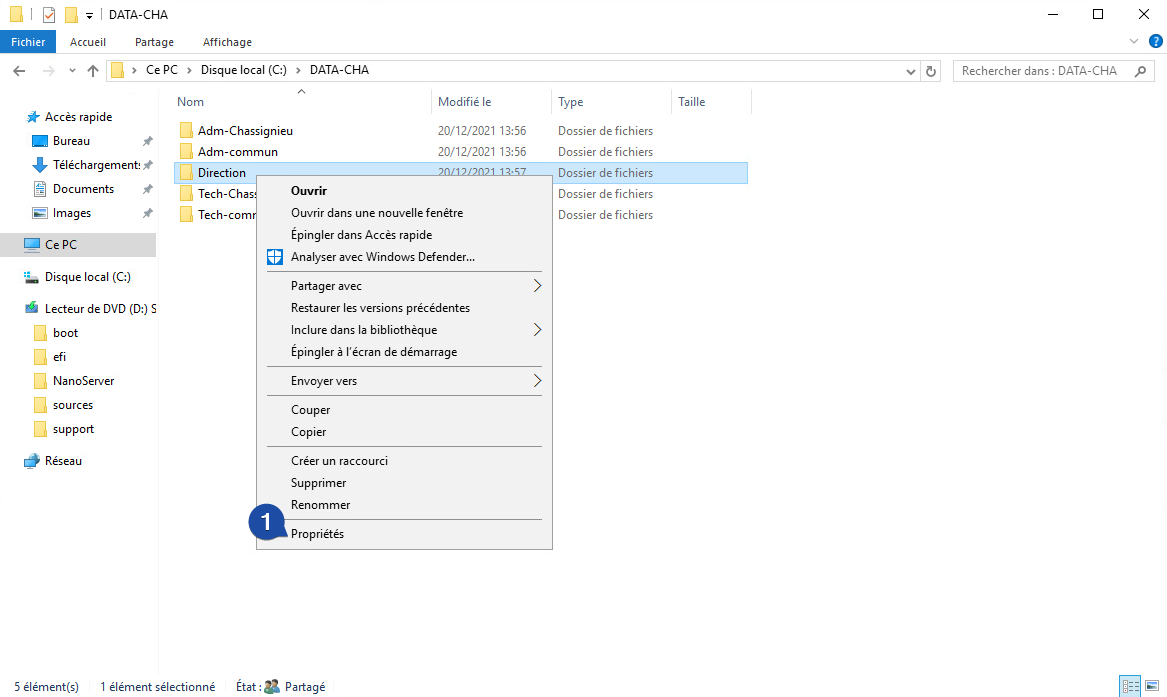
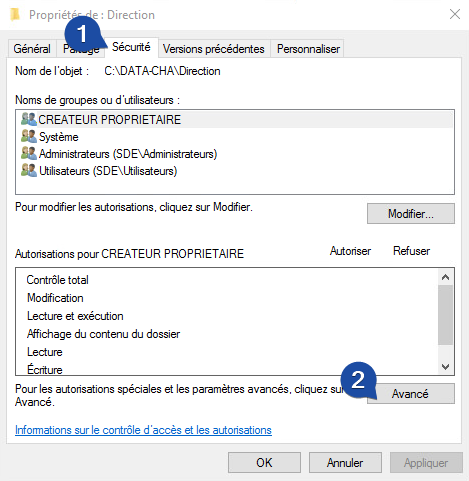
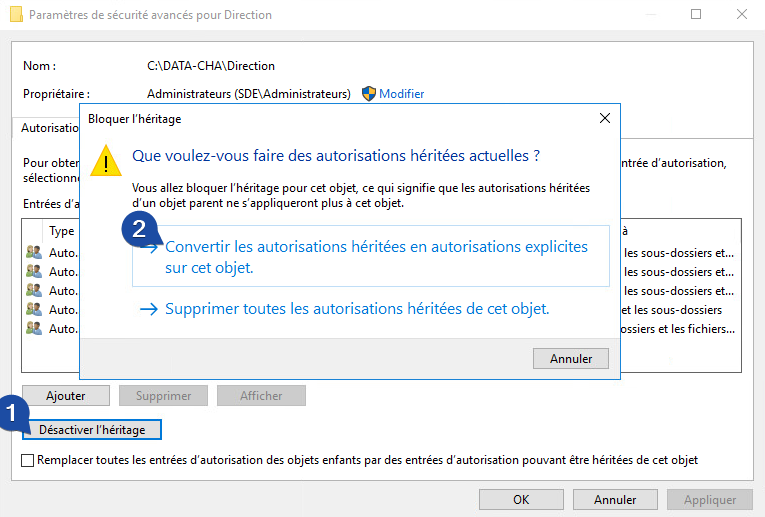
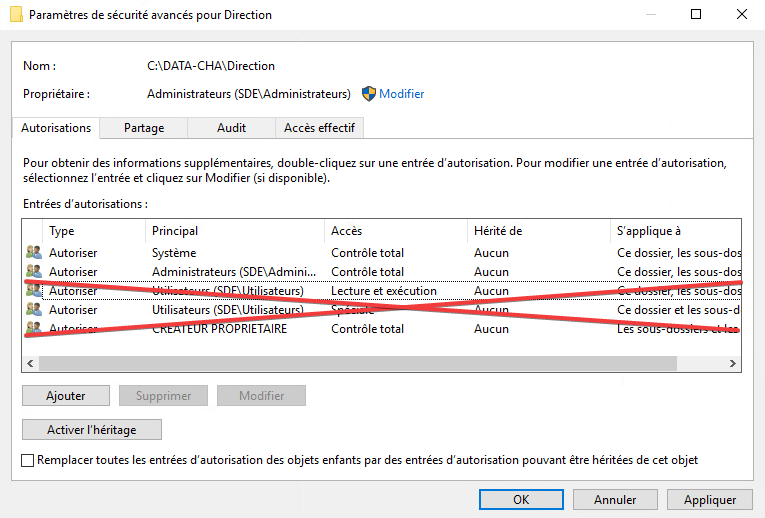
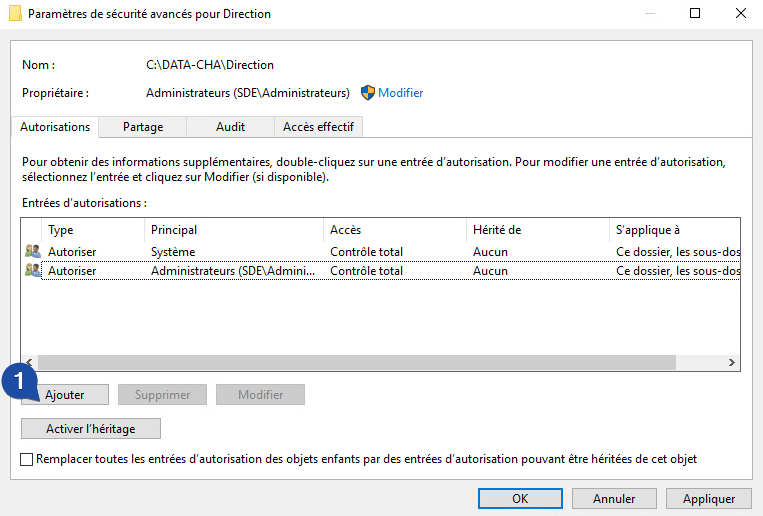
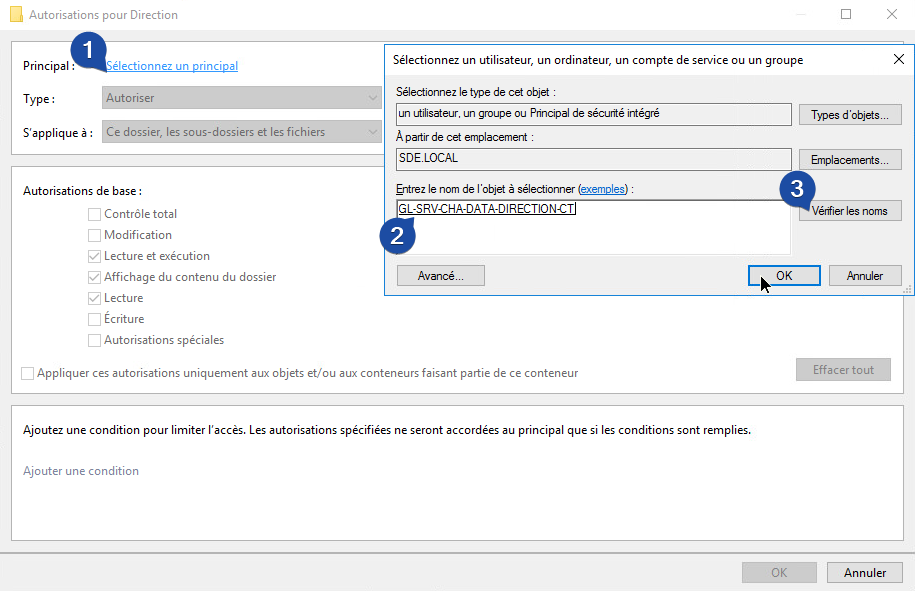
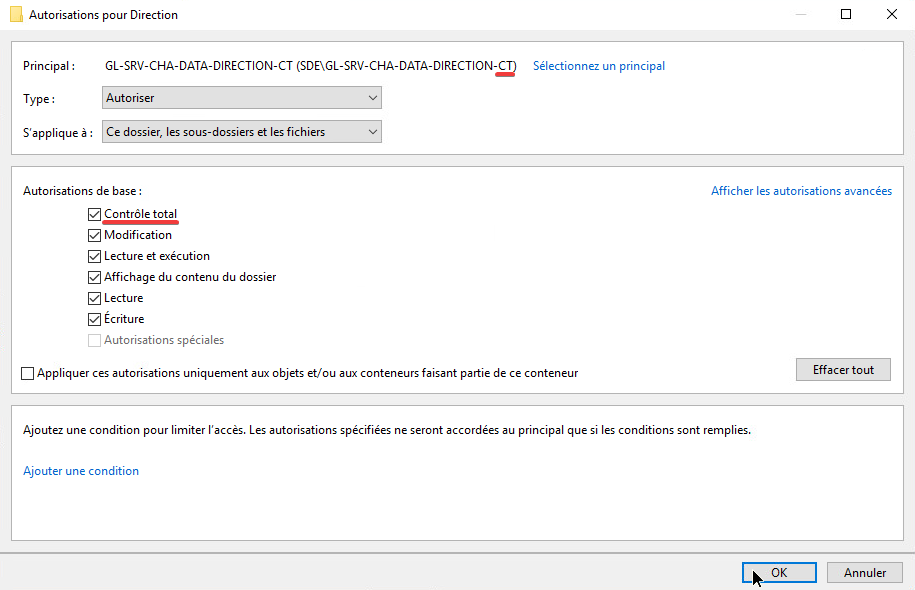
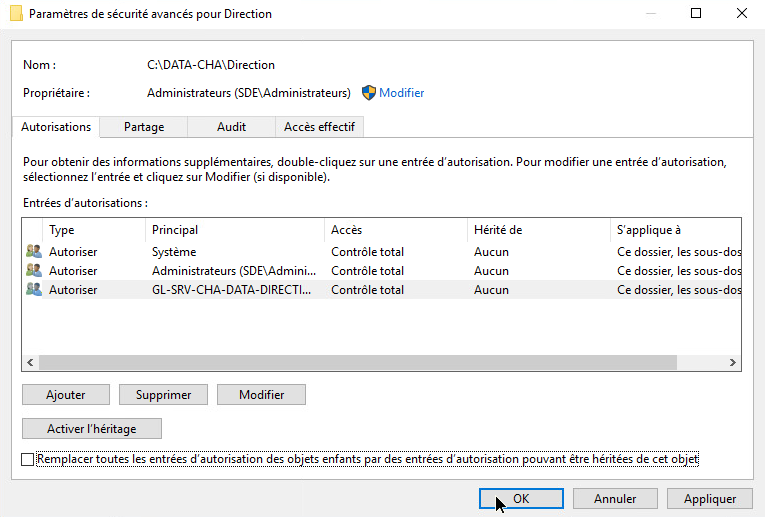
Repeat this procedure for every row of the permission table. In the end, each folder exposes a short, readable list: SYSTEM, Administrators, and one or two GL- groups.
The data is compartmentalised. What remains is making it reachable effortlessly for the user, who should not have to memorise a single UNC path.
Making the data reachable from the workstation
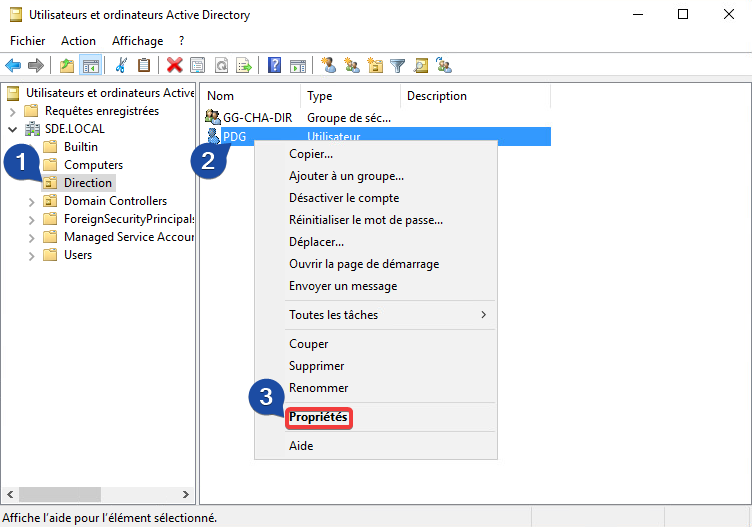
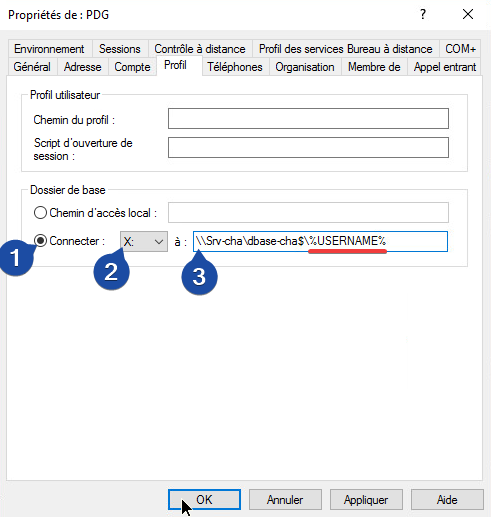
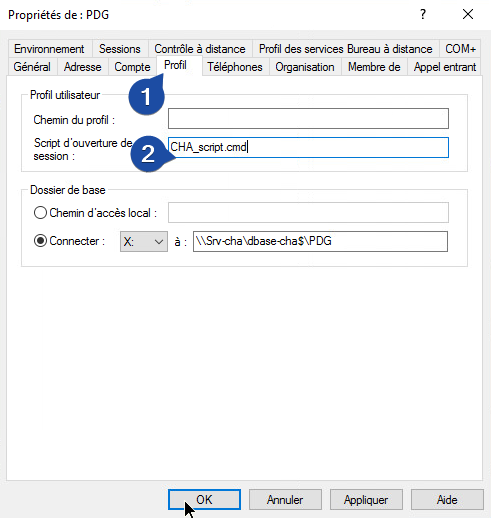
Three mechanisms complete each other, all set from the same Profile tab of the user account, plus one script for the dynamic part.
| Letter | Content | Path | Set by |
|---|---|---|---|
X: | the user’s personal folder | \\SRV-<site>\DBASE-<site>$\%USERNAME% | Profile tab, Home folder section |
Y: | common share, identical for everyone | \\SRV-CHA\DATA-CHA$ | logon script |
Z: | the user’s own site share | \\SRV-<site>\DATA-<site>$ | logon script |
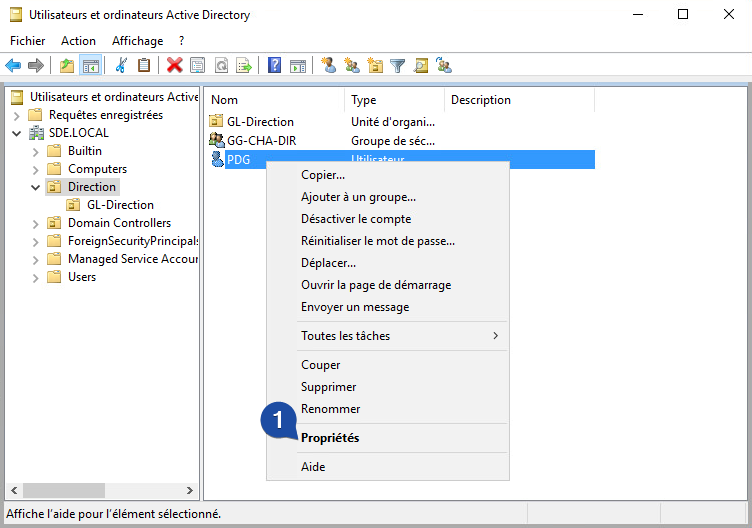
The home folder
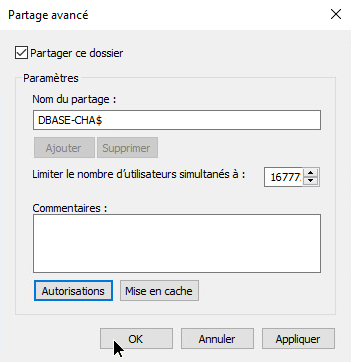
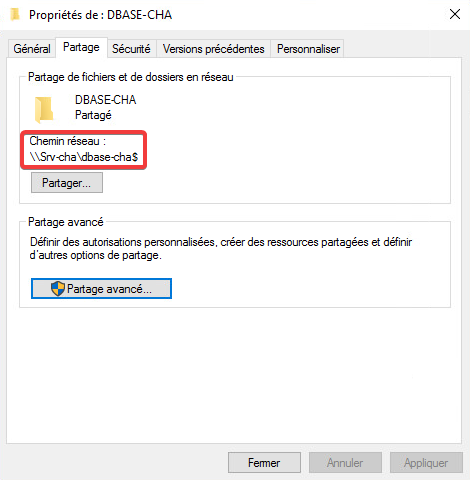
The home folder is a personal directory hosted on the server, where the user keeps their documents. Storing it remotely rather than on the workstation brings two guarantees: it is included in the server backups, and it stays available if the machine fails.
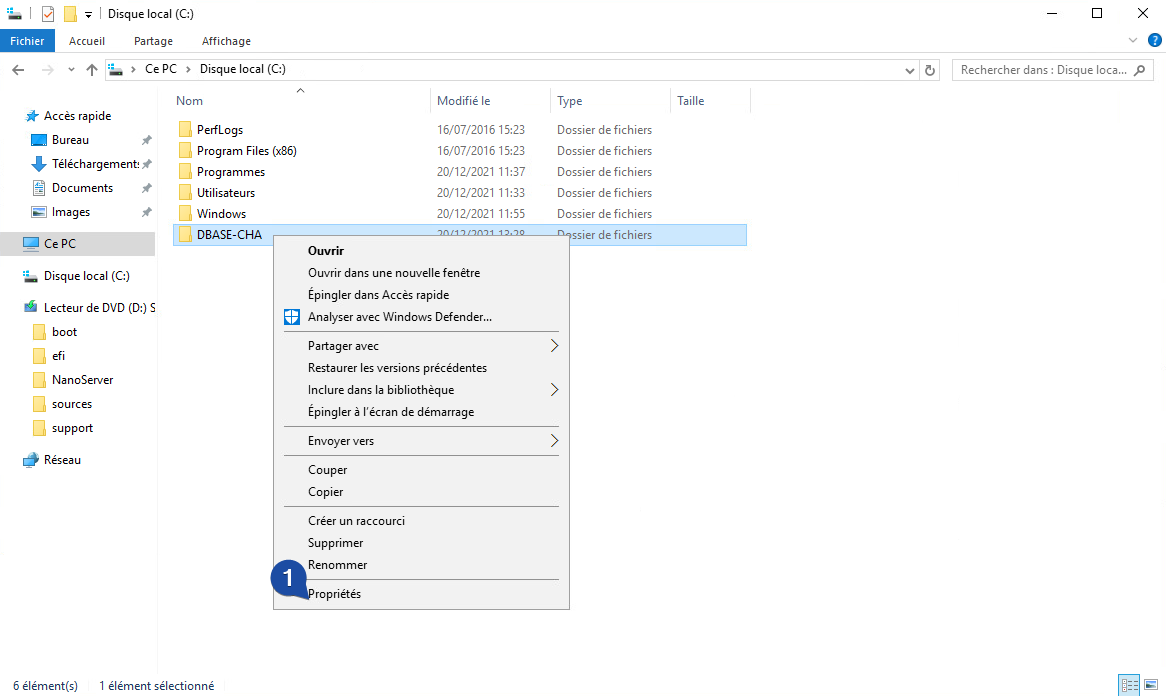
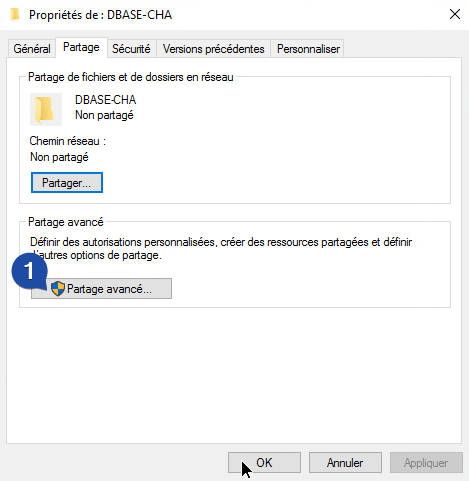
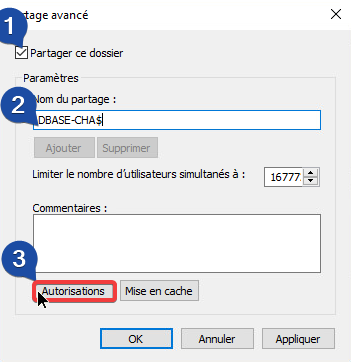
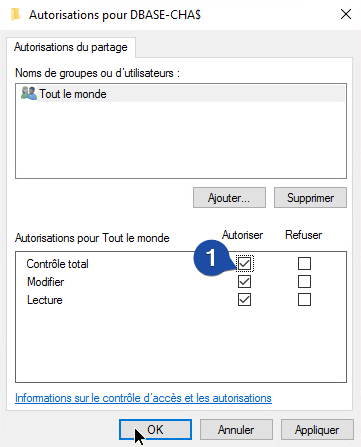
The network drives
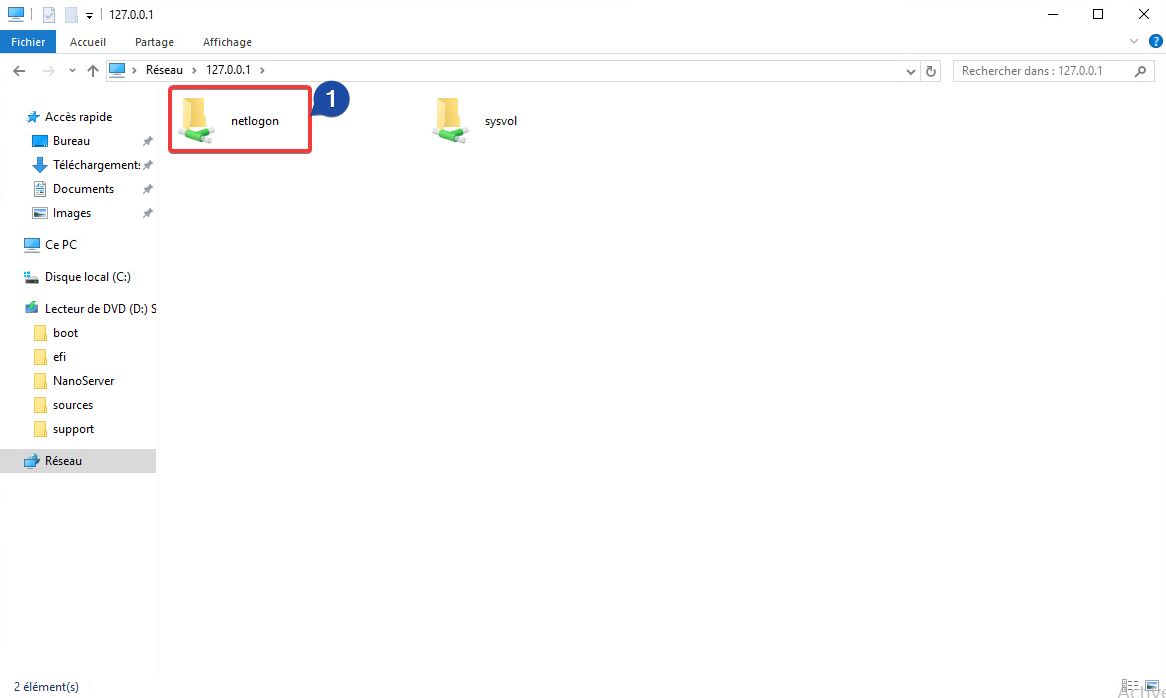
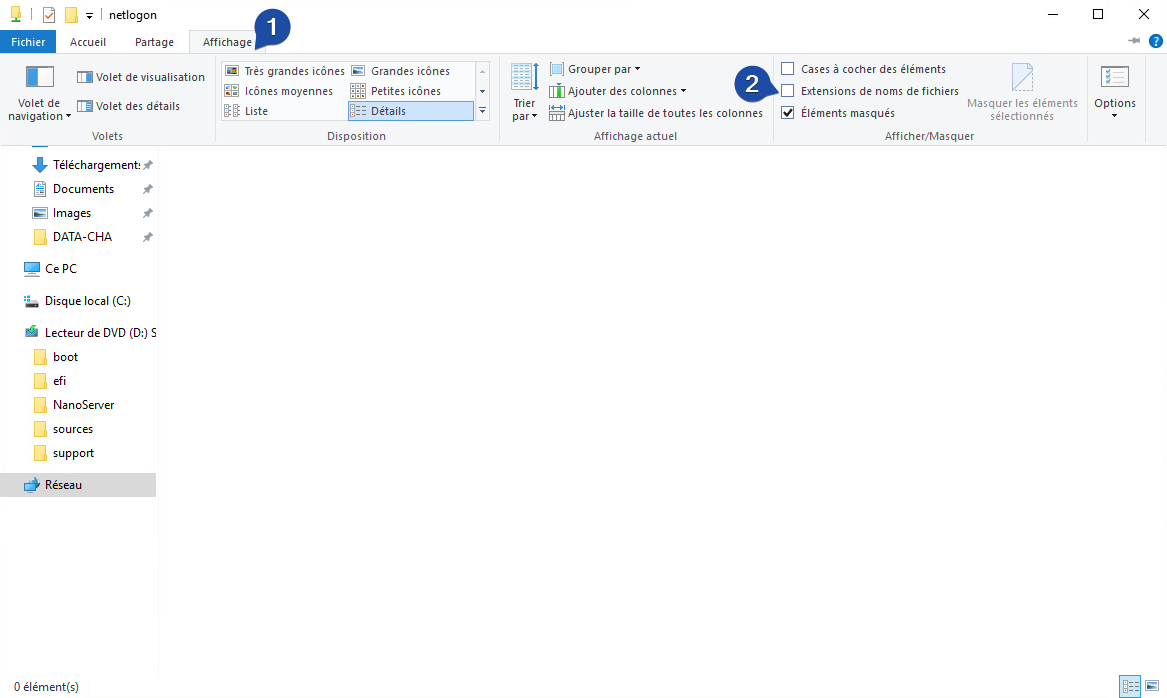
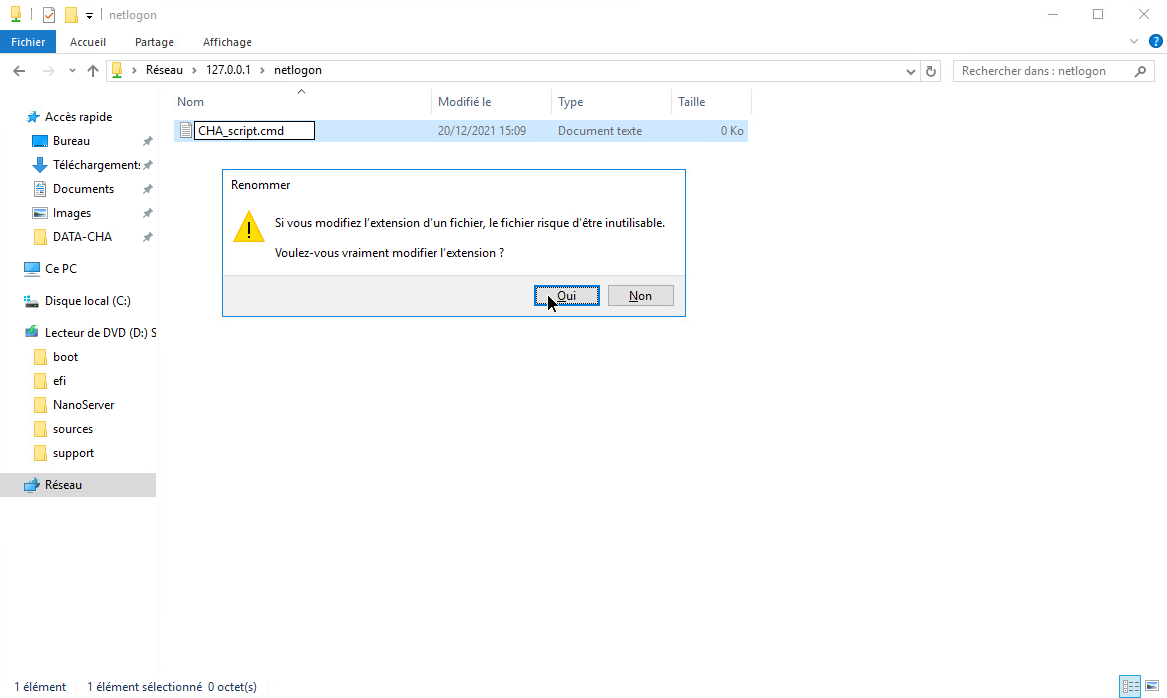
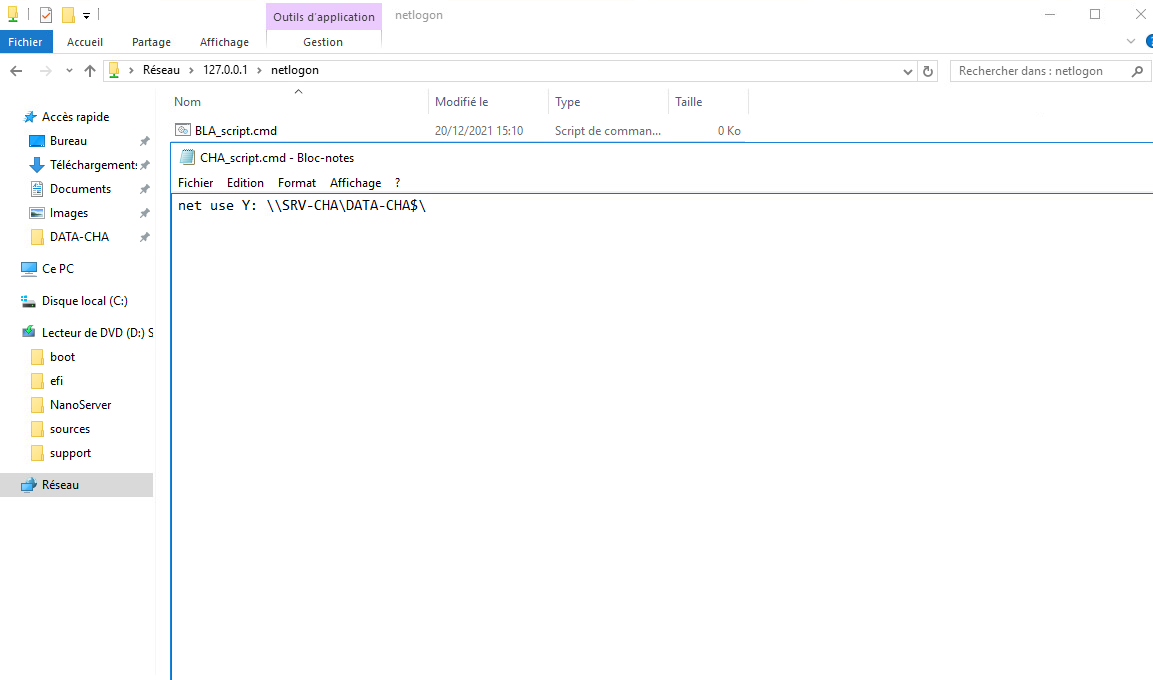
The home folder is mounted by Active Directory itself. The DATA shares, however, depend on the user’s site: a logon script stored in the domain’s NETLOGON share takes care of them.
net use Y: \\SRV-CHA\DATA-CHA$net use Y: \\SRV-CHA\DATA-CHA$net use Z: \\SRV-VIR\DATA-VIR$net use Y: \\SRV-CHA\DATA-CHA$net use Z: \\SRV-BLA\DATA-BLA$Concretely, for a user attached to Blandin:
X:points to\\SRV-BLA\DBASE-BLA$\USER_NAME, their personal space.Y:points to\\SRV-CHA\DATA-CHA$, the common share hosted at headquarters. Thanks to ABE and the NTFS permissions, they only see the folders they hold at least read access on.Z:points to\\SRV-BLA\DATA-BLA$, their own site share, filtered the same way.
Roaming profiles
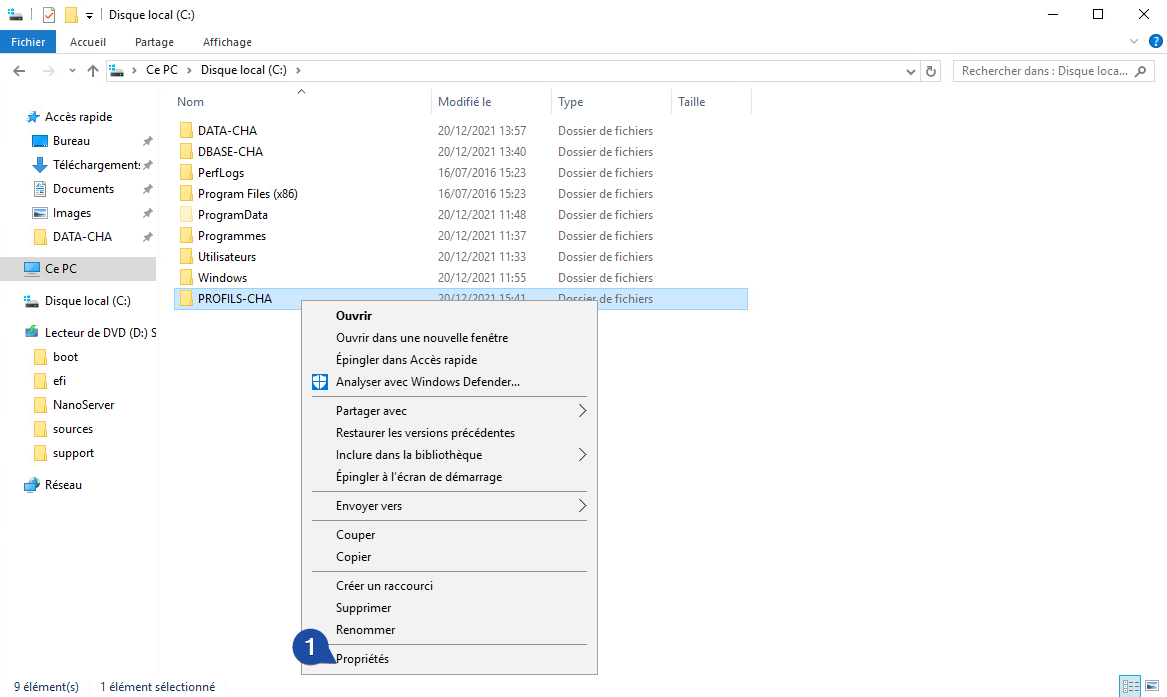
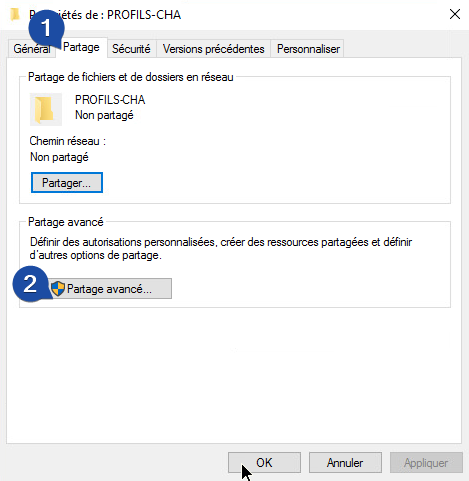
The data is now reachable from any workstation, but the working environment is still local: desktop, favourites, application preferences. Roaming profiles complete the setup by storing that profile on the server and copying it down to the machine at each logon.
The mechanics are identical to the home folder: publish a share, then point the account at it.
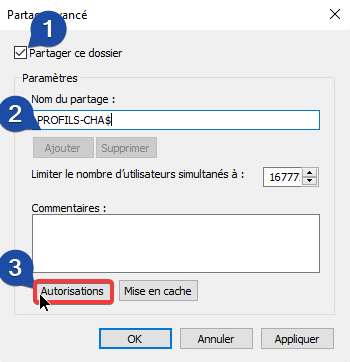
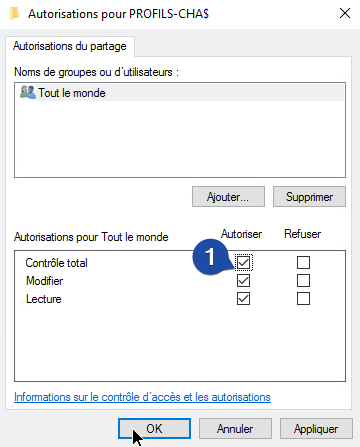
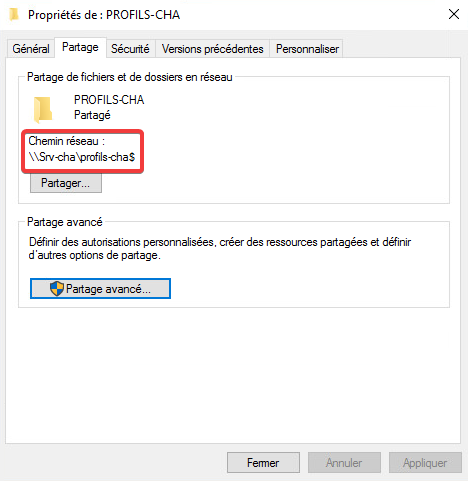
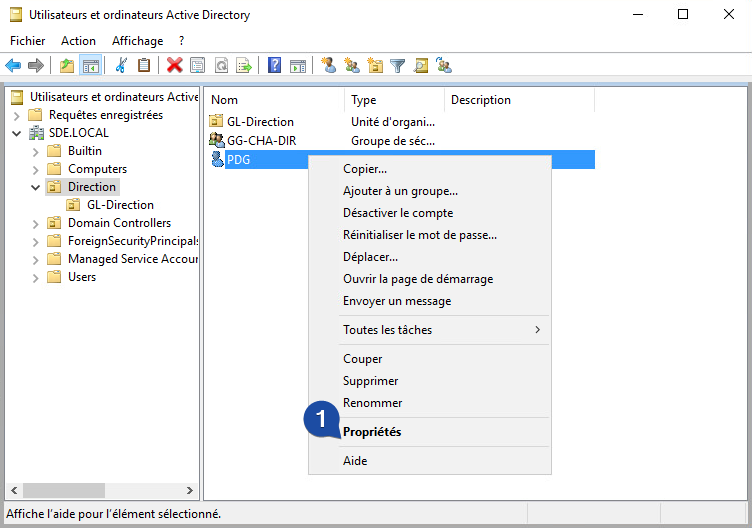
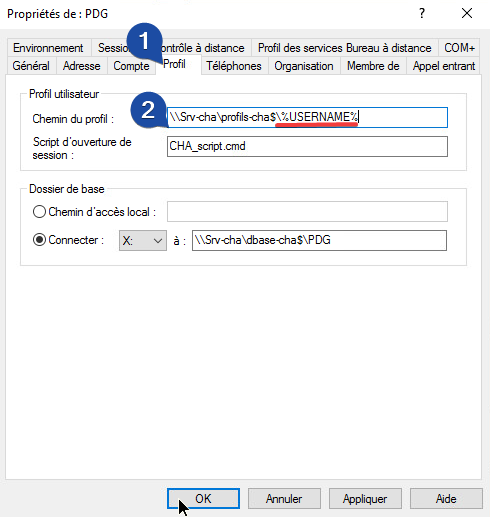
Everything is configured on the server side. The only proof that counts is a real logon from a client machine.
Verify and recap
The first user test
Join a client to the SDE.LOCAL domain, reboot it, then log on with a domain account, ADM1B for instance. Then work through the list below, which replays the AGDLP chain in reverse and pinpoints the failing link immediately.
| To check | Expected result | What it validates |
|---|---|---|
| Logon with the domain account | the session opens | the account exists and the machine joined the domain |
X: present in File Explorer | empty personal folder | home folder and DBASE share |
Y: and Z: present | drives mounted | NETLOGON script assigned to the account |
Contents of Y: | only the authorised folders | ABE, NTFS permissions and the AGDLP chain |
Creating a file in an FC folder | success | Full Control domain-local group applied |
Creating a file in an R folder | denied | Read domain-local group applied |
| Changing the desktop then logging on to another machine | the desktop follows | roaming profile |
If one of them fails, the table below covers the most frequent causes.
| Symptom | Likely cause | Where to look |
|---|---|---|
| The user sees every folder in the share | ABE not enabled on that share | Server Manager, share properties |
| The user sees no folder at all | global group not nested, or domain-local group missing from the ACL | Member Of tab of the GG, Security tab of the folder |
| Access denied despite NTFS Full Control | share layer more restrictive than NTFS | Sharing tab, Advanced Sharing, Permissions |
Drive Y: does not show up | script not assigned, wrong name, or hidden .txt extension | Profile tab of the account, contents of NETLOGON |
| Rights unchanged after editing a group | the session’s Kerberos token is still cached | log off then back on, or klist purge |
| The profile does not follow | path missing %USERNAME%, or PROFILS share unreachable | Profile tab, manual test of \\SRV-CHA\profils-cha$ |
The complete chain, end to end
For a Management user, everything just built fits on one line:
PDG (account, Management OU) > member of GG-CHA-DIR (global group, Management OU) > member of GL-SRV-CHA-DATA-MANAGEMENT-FC (domain-local group, GL-Direction OU) > NTFS Full Control on \\SRV-CHA\DATA-CHA$\Management > visible in Y: thanks to ABE and the logon scriptEach link has a single responsibility, and each one can change without touching the others: that is exactly what keeps this configuration sustainable over time.
The infrastructure works, but nothing yet stops a single user from filling up the share. That is the subject of the next article in the series: Apply quota on network shared directories.